Intake Forms: Difference between revisions
No edit summary |
No edit summary |
||
| (31 intermediate revisions by the same user not shown) | |||
| Line 1: | Line 1: | ||
This guide explains how to manage, assign, edit, and review patient intake forms in the '''VEHRDICT''' platform. Intake forms are essential for collecting patient data before and during visits. This workflow is for physicians and clinical staff and covers how to assign forms, track completion, edit or delete forms, and follow best practices. | |||
[[File:Vehrdict Intake Form.mp4|800px|'''Tutorial – Managing Patient Intake Forms''' – Step-by-step walkthrough of assigning, editing, and reviewing forms.]] | |||
=== Intake Form System Overview === | |||
The following areas are used to manage patient intake forms: | |||
* '''Templates''' – Houses reusable form templates. You can create, modify, or set templates as default for all patients. | |||
* '''Intake Forms''' | |||
** Patient – View, send, edit, or delete forms assigned to a patient. | |||
** Provider – Manage and view provider-specific forms. | |||
* '''Form Builder''' – Drag-and-drop interface to create custom forms. | |||
* '''Builder CSV''' – Upload structured CSVs to generate forms in bulk. | |||
* '''Library''' – View all available form templates. | |||
{{Tip|Use the Templates section to set standardized default forms across all patients.}} | |||
=== Accessing a Patient’s Intake Forms === | |||
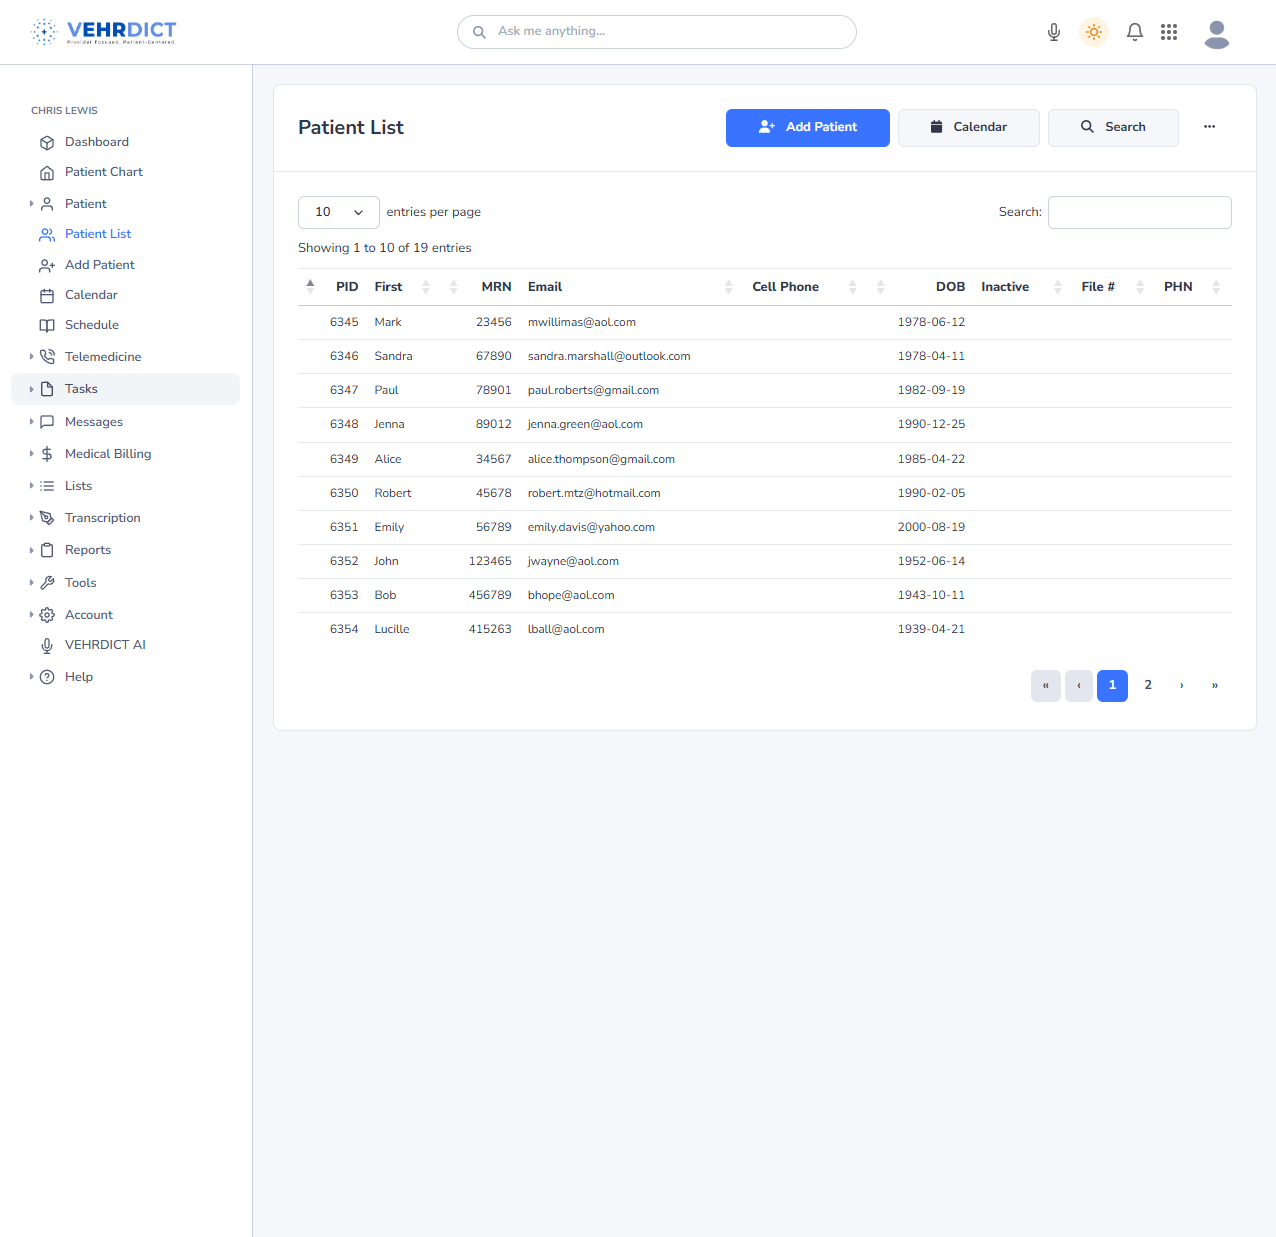
# Navigate to '''Patient List''' from the left-hand menu. | |||
# Use the search field or scroll to locate the patient. | |||
# Click on the patient’s name to open their '''Patient Chart'''. | |||
[[File:Screenshot 2025-06-17 110815.png|800px|'''Patient List''' – View and search all registered patients, including MRN, contact info, and DOB.]] | |||
=== Reviewing Assigned Intake Forms === | |||
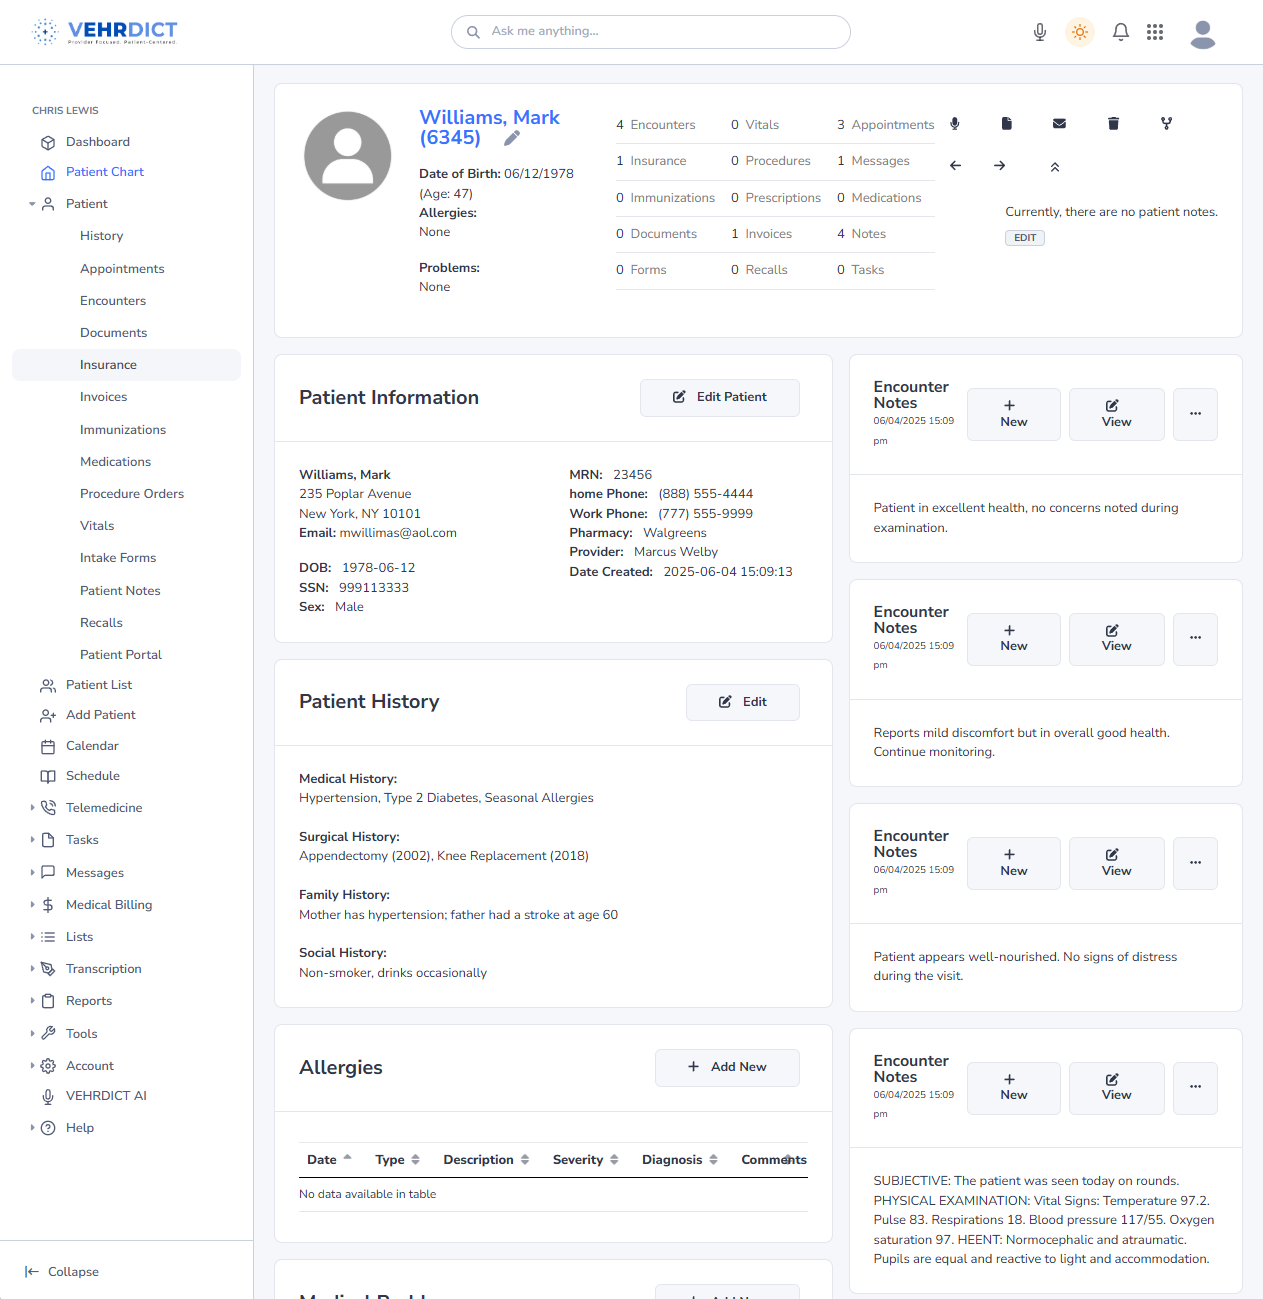
# In the '''Patient Chart''', select '''Intake Forms''' from the left-hand menu. | |||
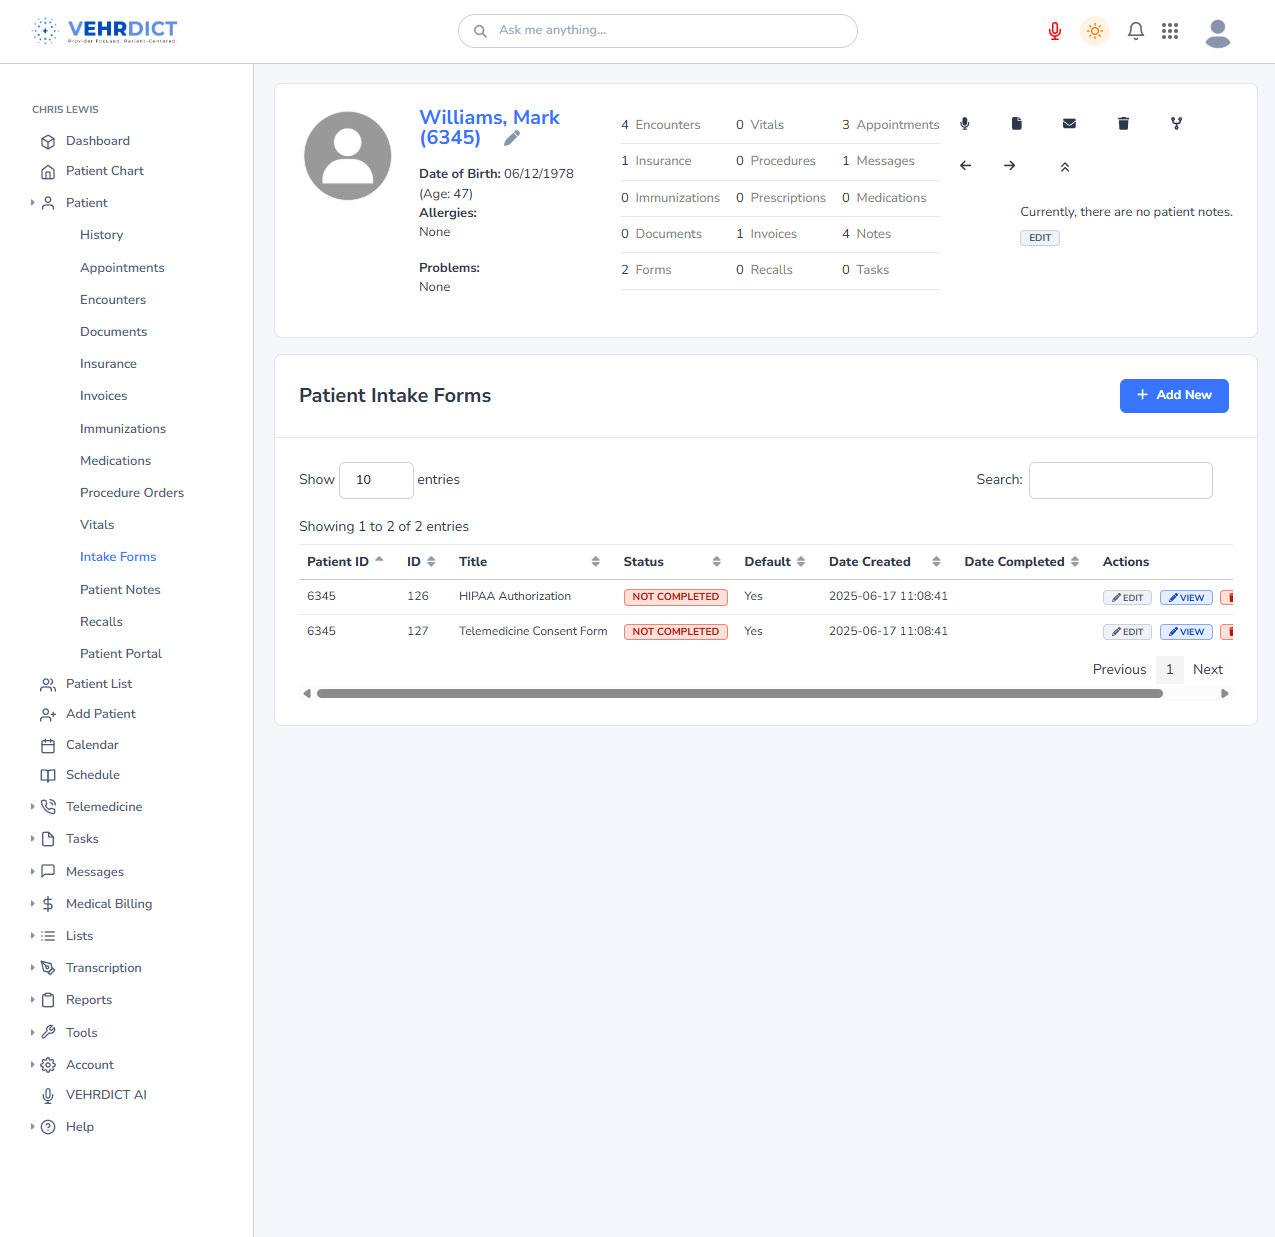
# Review the assigned forms and their current statuses: | |||
{| class="wikitable" | |||
! Column !! Description | |||
|- | |||
| '''Status''' || Indicates if the form is '''COMPLETED''' or '''NOT COMPLETED'''. | |||
|- | |||
| '''Actions''' || | |||
'''SEND''' – Resend the form to the patient | |||
'''EDIT''' – Modify the form or set as default | |||
'''VIEW''' – Preview form in read-only mode | |||
'''DELETE''' – Permanently remove the form | |||
|} | |||
[[File:Screenshot 2025-06-17 110835.png|800px|'''Patient Chart Overview''' – Access vital stats, contact info, encounters, allergies, and historical data.]] | |||
=== Assigning a New Intake Form === | |||
# Click the blue '''+ Add New''' button at the top-right of the Intake Forms panel. | |||
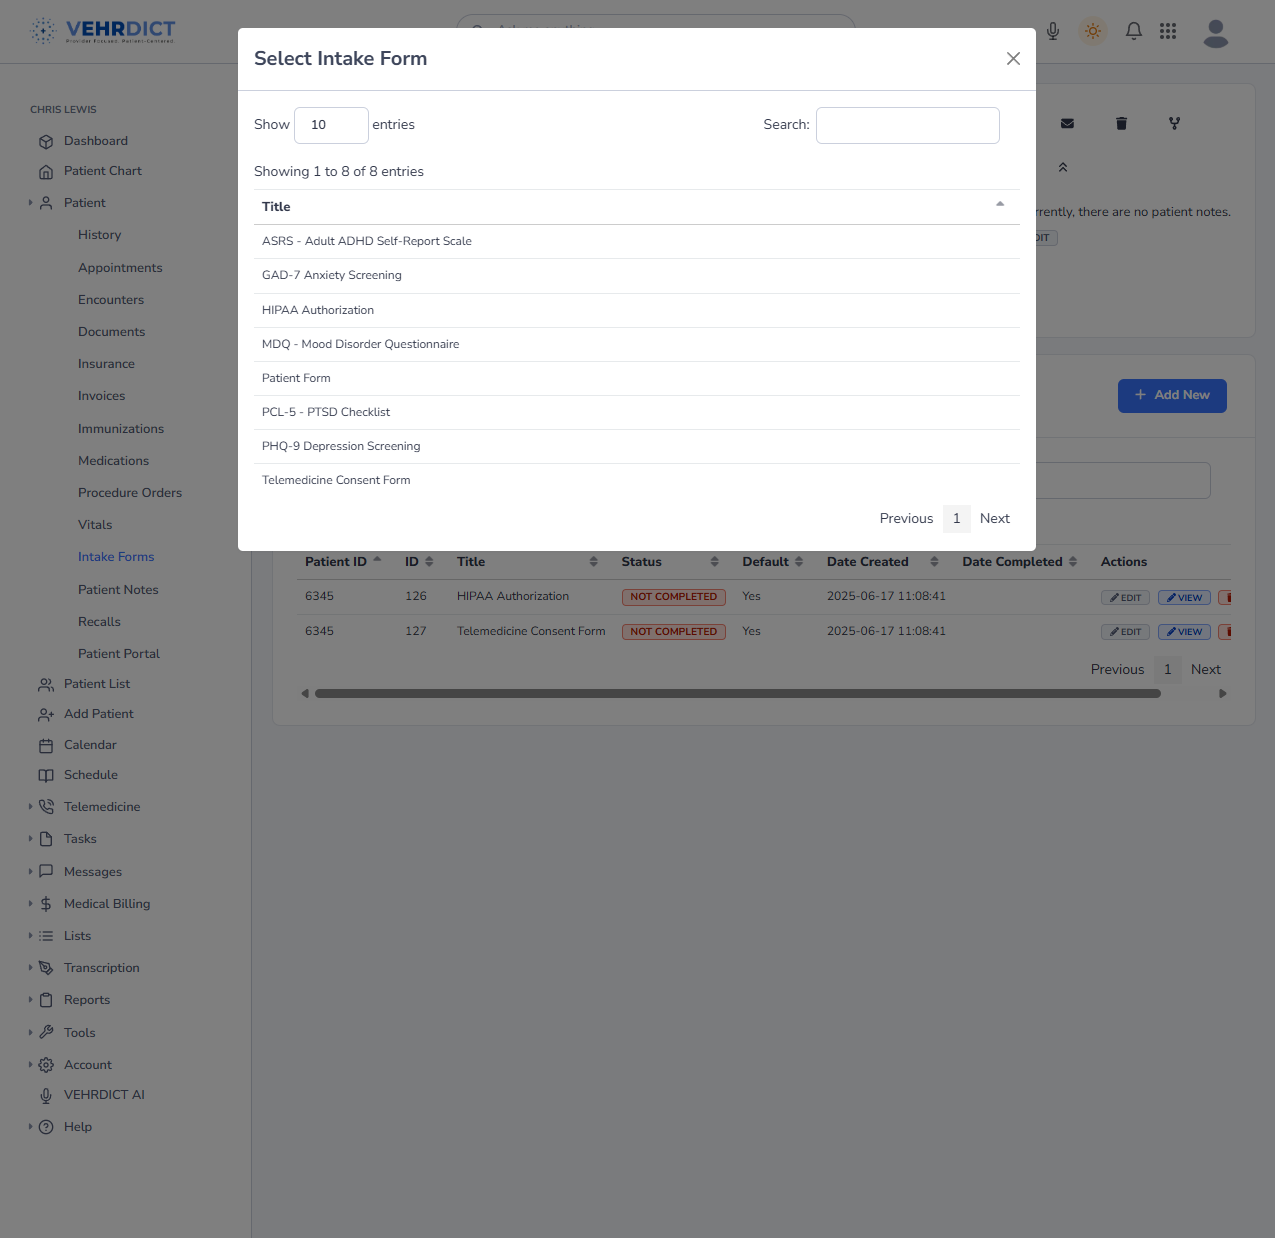
# A modal window will appear with available form templates. | |||
# Select one or more templates to assign to the patient. | |||
# Click '''Confirm''' to complete the assignment. | |||
[[File:Screenshot 2025-06-17 110849.png|800px|'''Patient Intake Forms''' – View assigned forms, completion status, and perform actions like edit or view.]] | |||
=== Editing and Viewing Forms === | |||
* '''Edit''' – Open the form for editing. You may also set it as a default for all patients or remove it from an individual patient. | |||
* '''View''' – Open the form in read-only mode for quick review. | |||
[[File:Screenshot 2025-06-17 110904.png|800px|'''Select Intake Form''' – Choose from predefined form templates to assign to a patient.]] | |||
=== Deleting a Form === | |||
If a form was assigned in error: | If a form was assigned in error: | ||
# Click the red '''Delete''' button next to the form. | |||
# Confirm deletion when prompted. | |||
{{Warning|Deleted forms are permanently removed and cannot be recovered.}} | |||
=== Viewing Patient Overview === | |||
Return to the main '''Patient Chart''' view to access: | |||
* Appointment history and upcoming visits | |||
* Recorded vitals and medical measurements | |||
* Demographic and contact information | |||
* Provider notes and patient medical history | |||
=== Best Practices === | |||
{{Tip|Assign critical forms such as HIPAA and Consent during initial intake setup.}} | |||
* Use the '''Set as Default''' option to apply forms to all new patients automatically. | |||
* Monitor the '''Date Completed''' field to ensure timely compliance. | |||
* Use patient messaging tools to notify patients of pending or incomplete forms. | |||
* Periodically review templates in the Library to keep documentation current. | |||
=== Related Topics === | |||
* [[Patient Documents]] – Guide to downloading and archiving completed forms | |||
* [[Secure Messaging]] – Instructions for sending secure messages and reminders to patients | |||
=== Support === | |||
For technical | For technical assistance, click '''Help''' from the main sidebar or contact your VEHRDICT administrator. | ||
Latest revision as of 22:09, 2 July 2025
This guide explains how to manage, assign, edit, and review patient intake forms in the VEHRDICT platform. Intake forms are essential for collecting patient data before and during visits. This workflow is for physicians and clinical staff and covers how to assign forms, track completion, edit or delete forms, and follow best practices.
Intake Form System Overview
The following areas are used to manage patient intake forms:
- Templates – Houses reusable form templates. You can create, modify, or set templates as default for all patients.
- Intake Forms
- Patient – View, send, edit, or delete forms assigned to a patient.
- Provider – Manage and view provider-specific forms.
- Form Builder – Drag-and-drop interface to create custom forms.
- Builder CSV – Upload structured CSVs to generate forms in bulk.
- Library – View all available form templates.
Tip: Use the Templates section to set standardized default forms across all patients.
Accessing a Patient’s Intake Forms
- Navigate to Patient List from the left-hand menu.
- Use the search field or scroll to locate the patient.
- Click on the patient’s name to open their Patient Chart.
Reviewing Assigned Intake Forms
- In the Patient Chart, select Intake Forms from the left-hand menu.
- Review the assigned forms and their current statuses:
| Column | Description |
|---|---|
| Status | Indicates if the form is COMPLETED or NOT COMPLETED. |
| Actions |
SEND – Resend the form to the patient EDIT – Modify the form or set as default VIEW – Preview form in read-only mode DELETE – Permanently remove the form |
Assigning a New Intake Form
- Click the blue + Add New button at the top-right of the Intake Forms panel.
- A modal window will appear with available form templates.
- Select one or more templates to assign to the patient.
- Click Confirm to complete the assignment.
Editing and Viewing Forms
- Edit – Open the form for editing. You may also set it as a default for all patients or remove it from an individual patient.
- View – Open the form in read-only mode for quick review.
Deleting a Form
If a form was assigned in error:
- Click the red Delete button next to the form.
- Confirm deletion when prompted.
Warning: Deleted forms are permanently removed and cannot be recovered.
Viewing Patient Overview
Return to the main Patient Chart view to access:
- Appointment history and upcoming visits
- Recorded vitals and medical measurements
- Demographic and contact information
- Provider notes and patient medical history
Best Practices
Tip: Assign critical forms such as HIPAA and Consent during initial intake setup.
- Use the Set as Default option to apply forms to all new patients automatically.
- Monitor the Date Completed field to ensure timely compliance.
- Use patient messaging tools to notify patients of pending or incomplete forms.
- Periodically review templates in the Library to keep documentation current.
Related Topics
- Patient Documents – Guide to downloading and archiving completed forms
- Secure Messaging – Instructions for sending secure messages and reminders to patients
Support
For technical assistance, click Help from the main sidebar or contact your VEHRDICT administrator.


