Add Patient: Difference between revisions
No edit summary |
No edit summary |
||
| (26 intermediate revisions by the same user not shown) | |||
| Line 1: | Line 1: | ||
The electronic healthcare record process begins by entering patient data. VEHRDICT offers a variety of methods for patient data entry, ensuring a fast, intuitive, and accurate process. These methods include importing existing data, utilizing patient intake forms, manual entry, document OCR, and speech-to-text. This page describes how to enter patient data using voice commands. | |||
[[File:Vehrdict_HowTo_AiPatientRecord_-_4K.mp4|center|800px|'''Tutorial Video''' – Learn how to add patients using VEHRDICT’s AI dictation workflow.]] | |||
== Adding a Patient Using AI == | |||
To create a new patient record using voice commands: | |||
# Click the microphone icon at the top toolbar. | |||
# Say: '''"Create a new patient record for..."''' and begin speaking naturally. | |||
* Example: Create a new patient record for patient John Doe, his address is 123 Main Street, phone number is 404-555-2323, email is j.doe@email.com, his birthday is July 4th of 1990. Do it. | |||
When finished, say: '''"Do it"''' or click the '''Do it''' button to create the record. | |||
[[File:add_patient_ai_2_nx.jpg|center|800px|'''Voice Command Entry''' – Speak patient data, and VEHRDICT fills the record automatically.]] | |||
Once the record is created: | |||
* Review the auto-filled fields. | |||
* Click the '''Edit Patient''' button to modify or complete missing information. | |||
[[File:patient_screen_nx.jpg|center|800px|'''Generated Patient Record''' – Fields are editable after voice entry.]] | |||
== Adding a Patient Manually == | |||
To add a patient manually: | |||
# Navigate to the main menu. | |||
# Click '''Add Patient'''. | |||
# Complete each section across the following tabs: | |||
* General | |||
* Contact | |||
* Demographics | |||
* Guardian | |||
* Misc | |||
* Portal | |||
Each tab captures specific data essential for a complete patient profile. | |||
=== | === General Tab === | ||
The '''General''' tab captures: | |||
* Full name | |||
* Date of birth | |||
* SSN | |||
* Gender | |||
* Basic identity information | |||
[[File:edit_patient_nx.jpg|center|800px|'''General Info Tab''' – Foundational patient information and demographics.]] | |||
=== Contact Tab === | |||
The '''Contact''' tab includes: | |||
* Emergency contact name and relationship | |||
* Phone numbers and email | |||
* Additional contact preferences | |||
[[File:Contacttab.jpg|center|800px|'''Emergency Contact Info''' – Ensure a point of contact is recorded.]] | |||
=== Demographics Tab === | |||
Here, you'll record: | |||
* Race | |||
* Ethnicity | |||
* Religion | |||
* Language preferences | |||
This information helps personalize care and improve documentation compliance. | |||
[[File:Demographicstab.jpg|center|800px|'''Demographics Tab''' – Required for care personalization and reporting.]] | |||
=== Guardian Tab === | |||
Use this section for minor patients or those with appointed guardians. | |||
* Enter guardian name and relationship | |||
* Select '''Self''' if the patient is their own guardian | |||
[[File:Guardiantab.jpg|center|800px|'''Guardian Information''' – Critical for dependent or pediatric records.]] | |||
=== Misc Tab === | |||
This flexible tab allows you to: | |||
* Upload a photo | |||
* Add provider assignments | |||
* Record sensitive status info such as: | |||
* Deceased status | |||
* Notes and tags | |||
[[File:Misctab.jpg|center|800px|'''Misc Tab''' – Upload photo, assign provider, or record status changes.]] | |||
=== Portal Tab === | |||
Here you enable and manage patient portal access: | |||
* Set up login credentials | |||
* Send a welcome email | |||
* View current portal access status | |||
[[File:patient_portal_tab_nx.jpg|center|800px|'''Patient Portal Tab''' – Manage access credentials and welcome messages.]] | |||
Once all required fields are filled and tabs completed, the patient record becomes active in the system and accessible for appointments, documentation, billing, and portal communication. | |||
Latest revision as of 09:11, 5 August 2025
The electronic healthcare record process begins by entering patient data. VEHRDICT offers a variety of methods for patient data entry, ensuring a fast, intuitive, and accurate process. These methods include importing existing data, utilizing patient intake forms, manual entry, document OCR, and speech-to-text. This page describes how to enter patient data using voice commands.
Adding a Patient Using AI
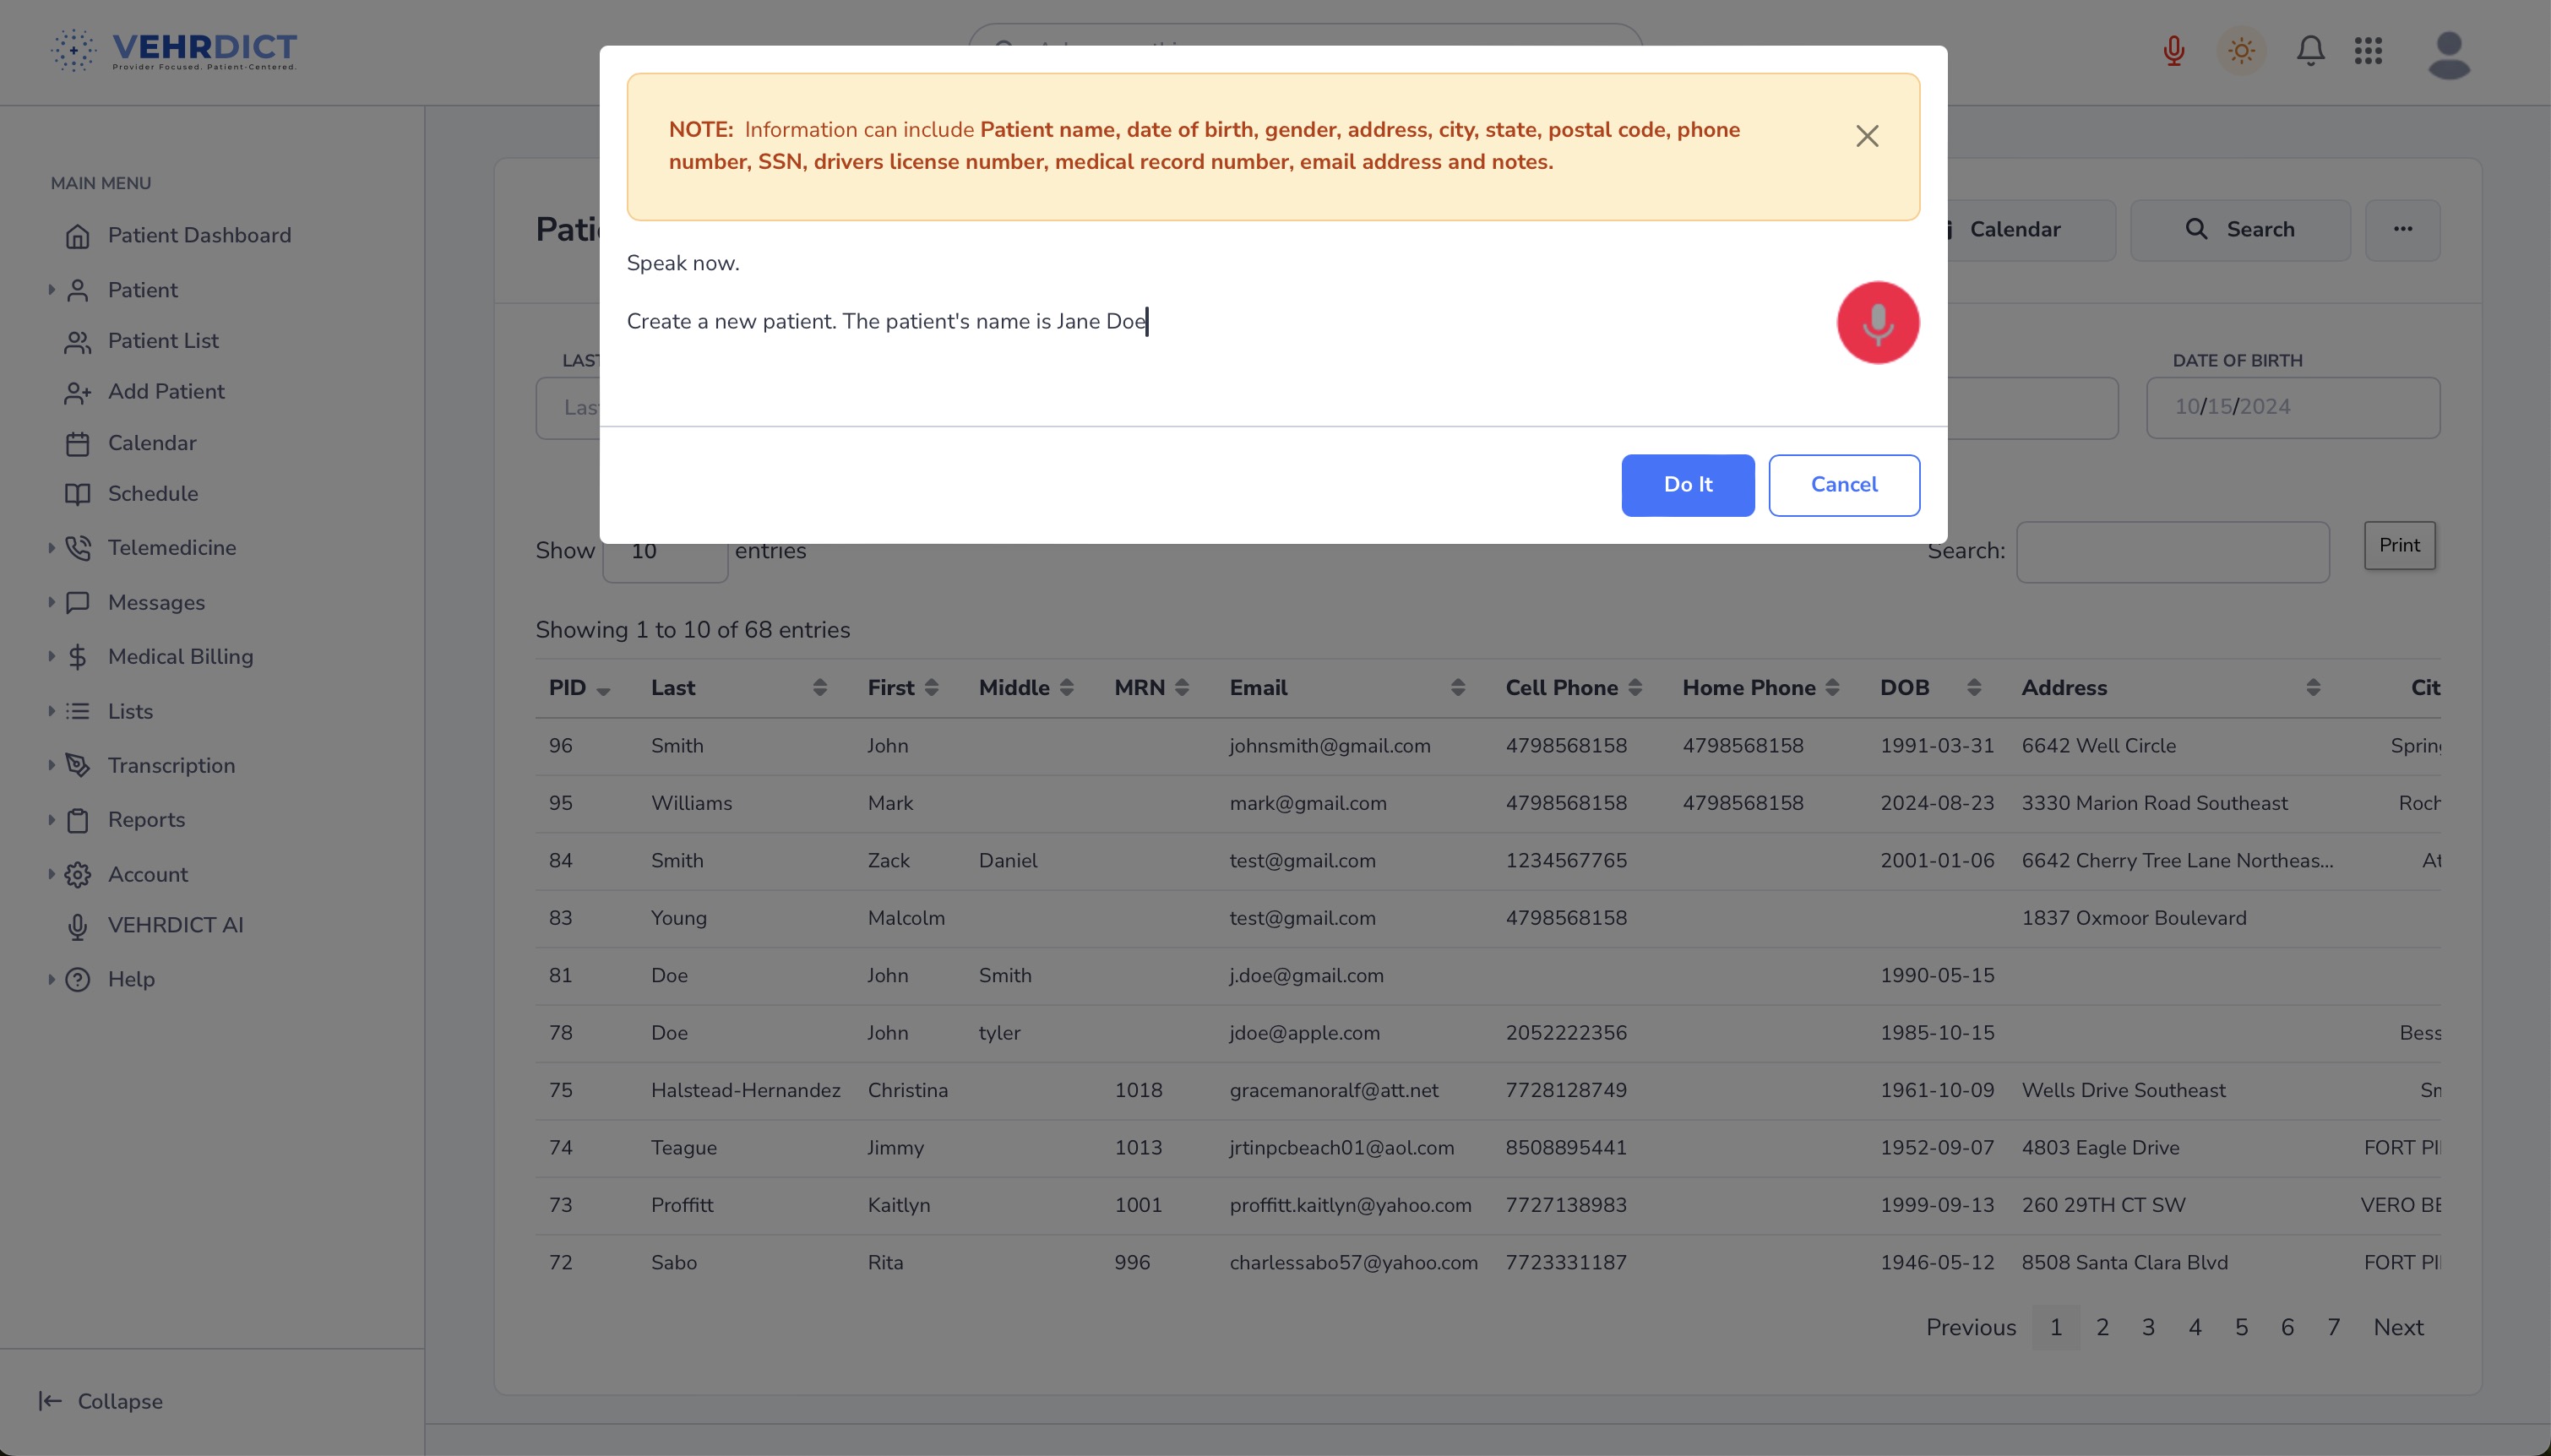
To create a new patient record using voice commands:
- Click the microphone icon at the top toolbar.
- Say: "Create a new patient record for..." and begin speaking naturally.
* Example: Create a new patient record for patient John Doe, his address is 123 Main Street, phone number is 404-555-2323, email is j.doe@email.com, his birthday is July 4th of 1990. Do it.
When finished, say: "Do it" or click the Do it button to create the record.
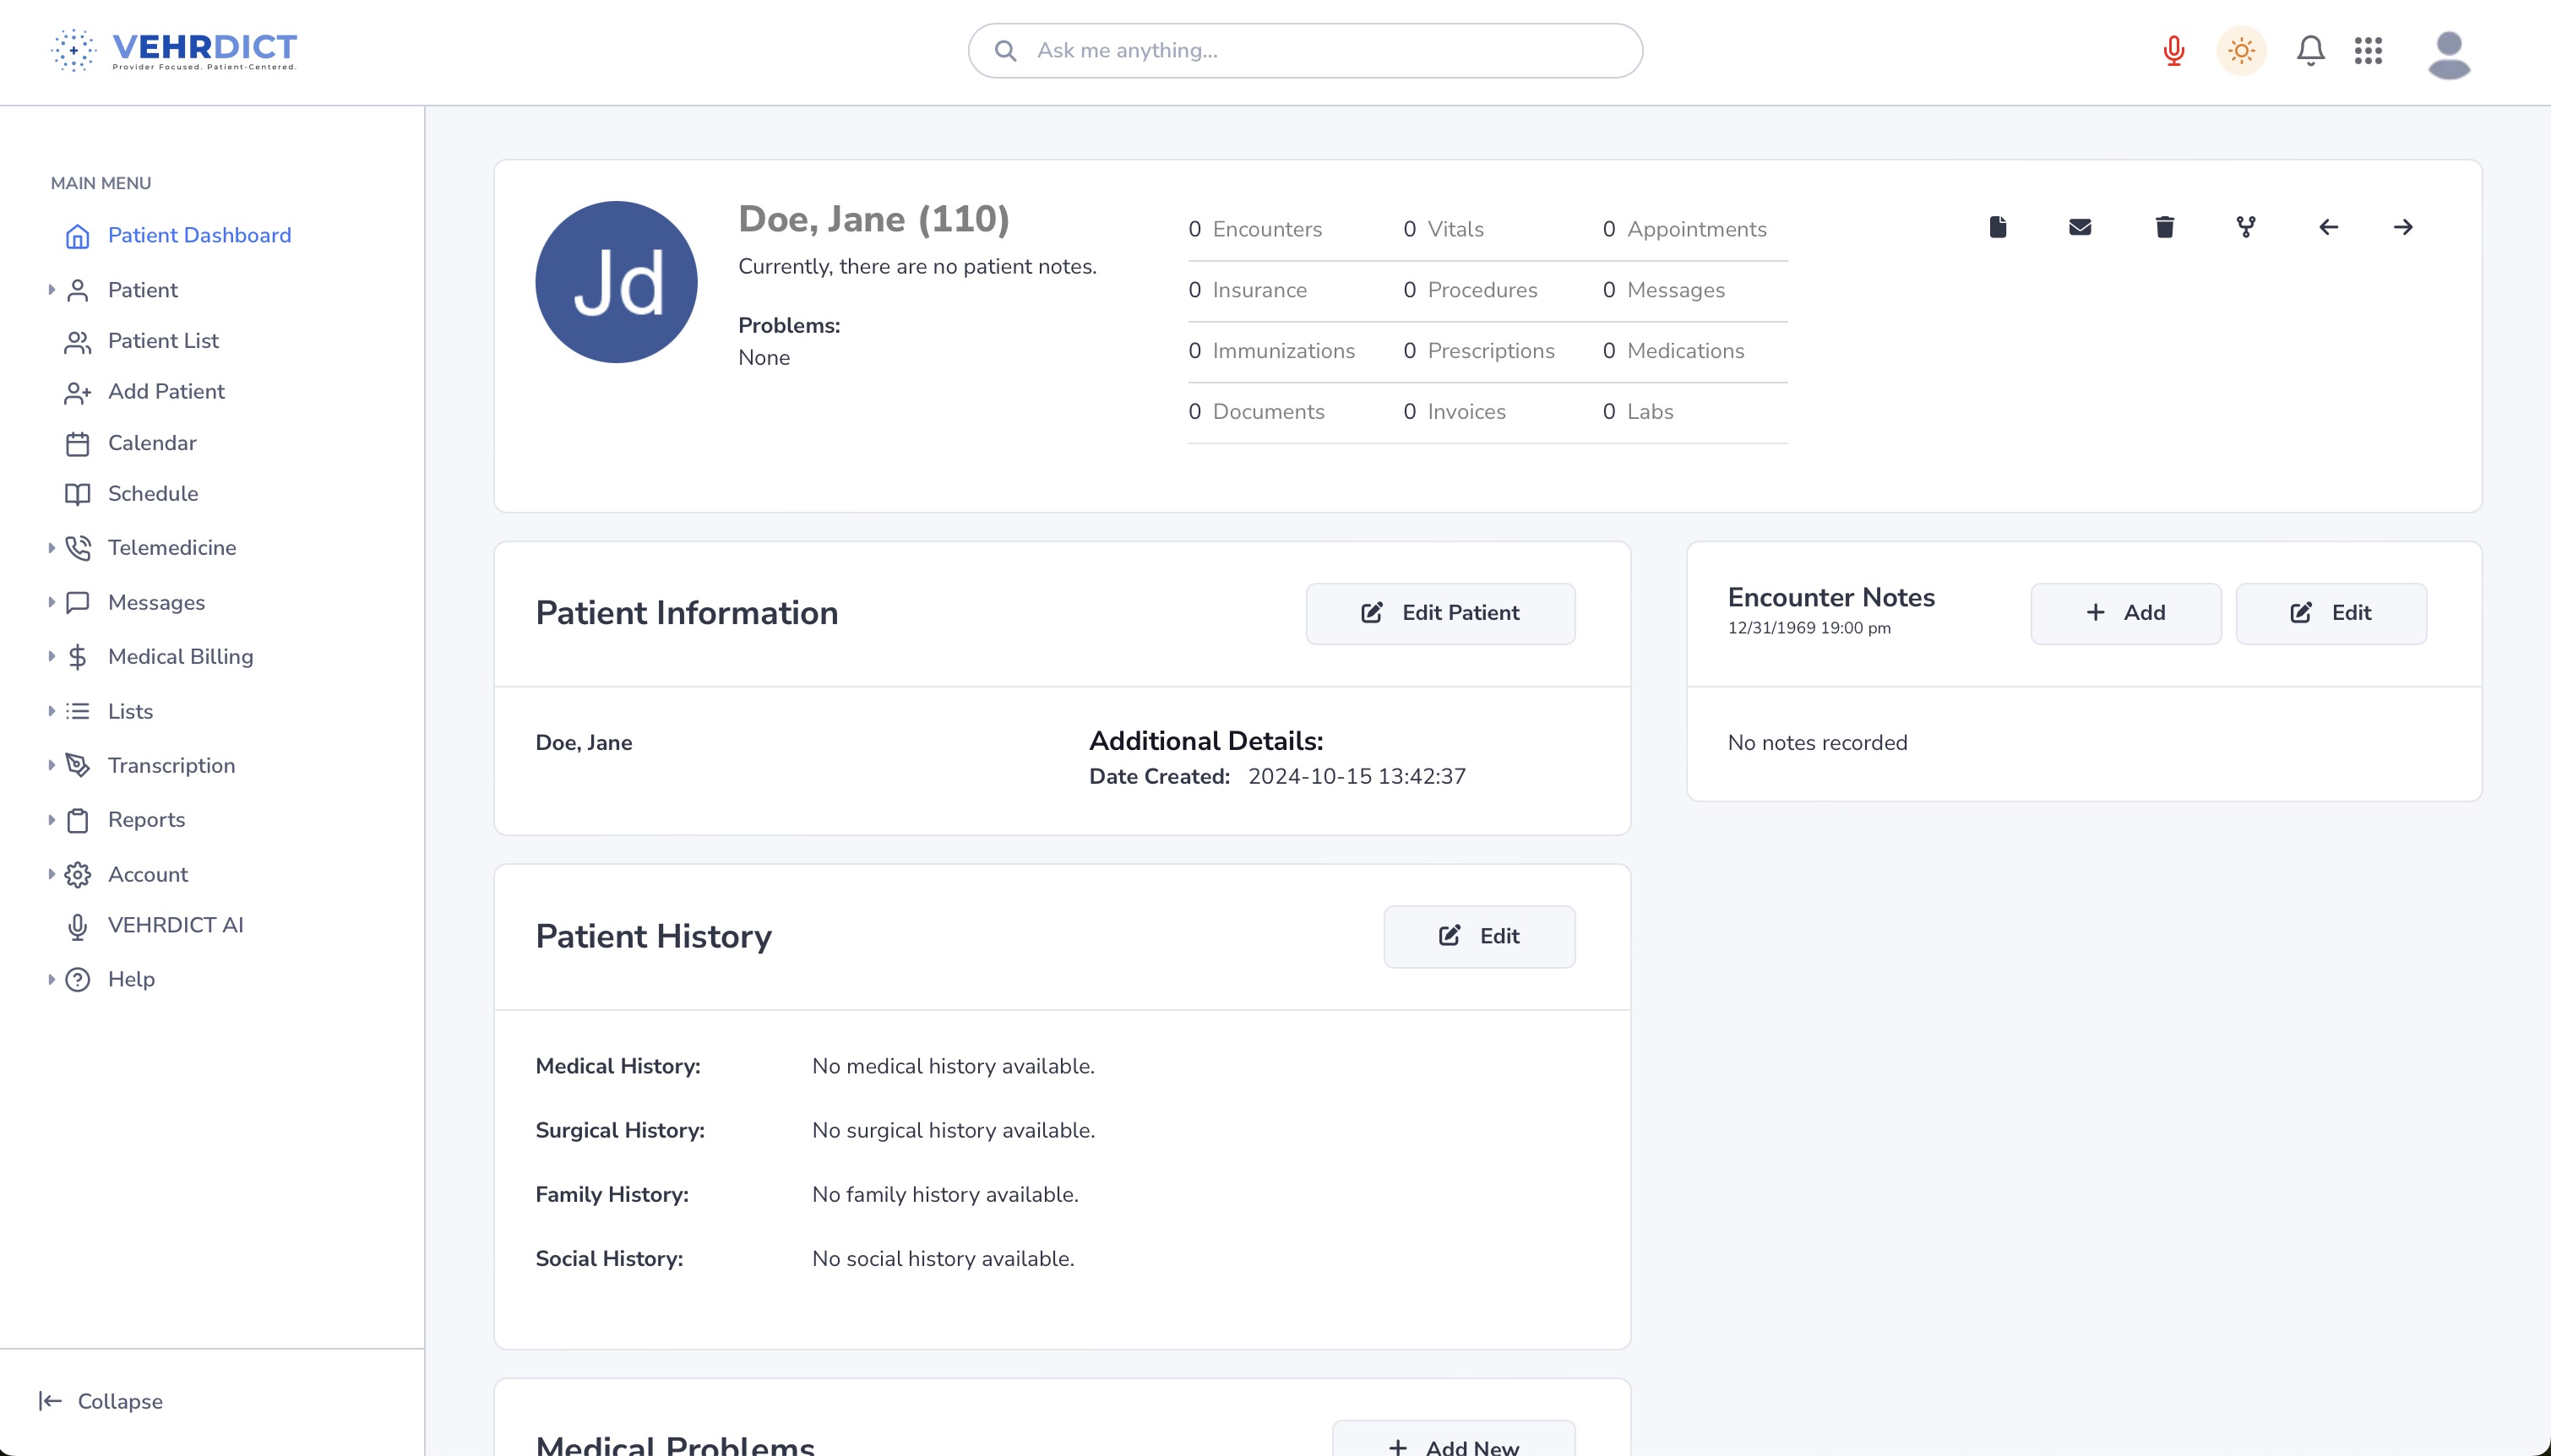
Once the record is created:
- Review the auto-filled fields.
- Click the Edit Patient button to modify or complete missing information.
Adding a Patient Manually
To add a patient manually:
- Navigate to the main menu.
- Click Add Patient.
- Complete each section across the following tabs:
  * General
  * Contact
  * Demographics
  * Guardian
  * Misc
  * Portal
Each tab captures specific data essential for a complete patient profile.
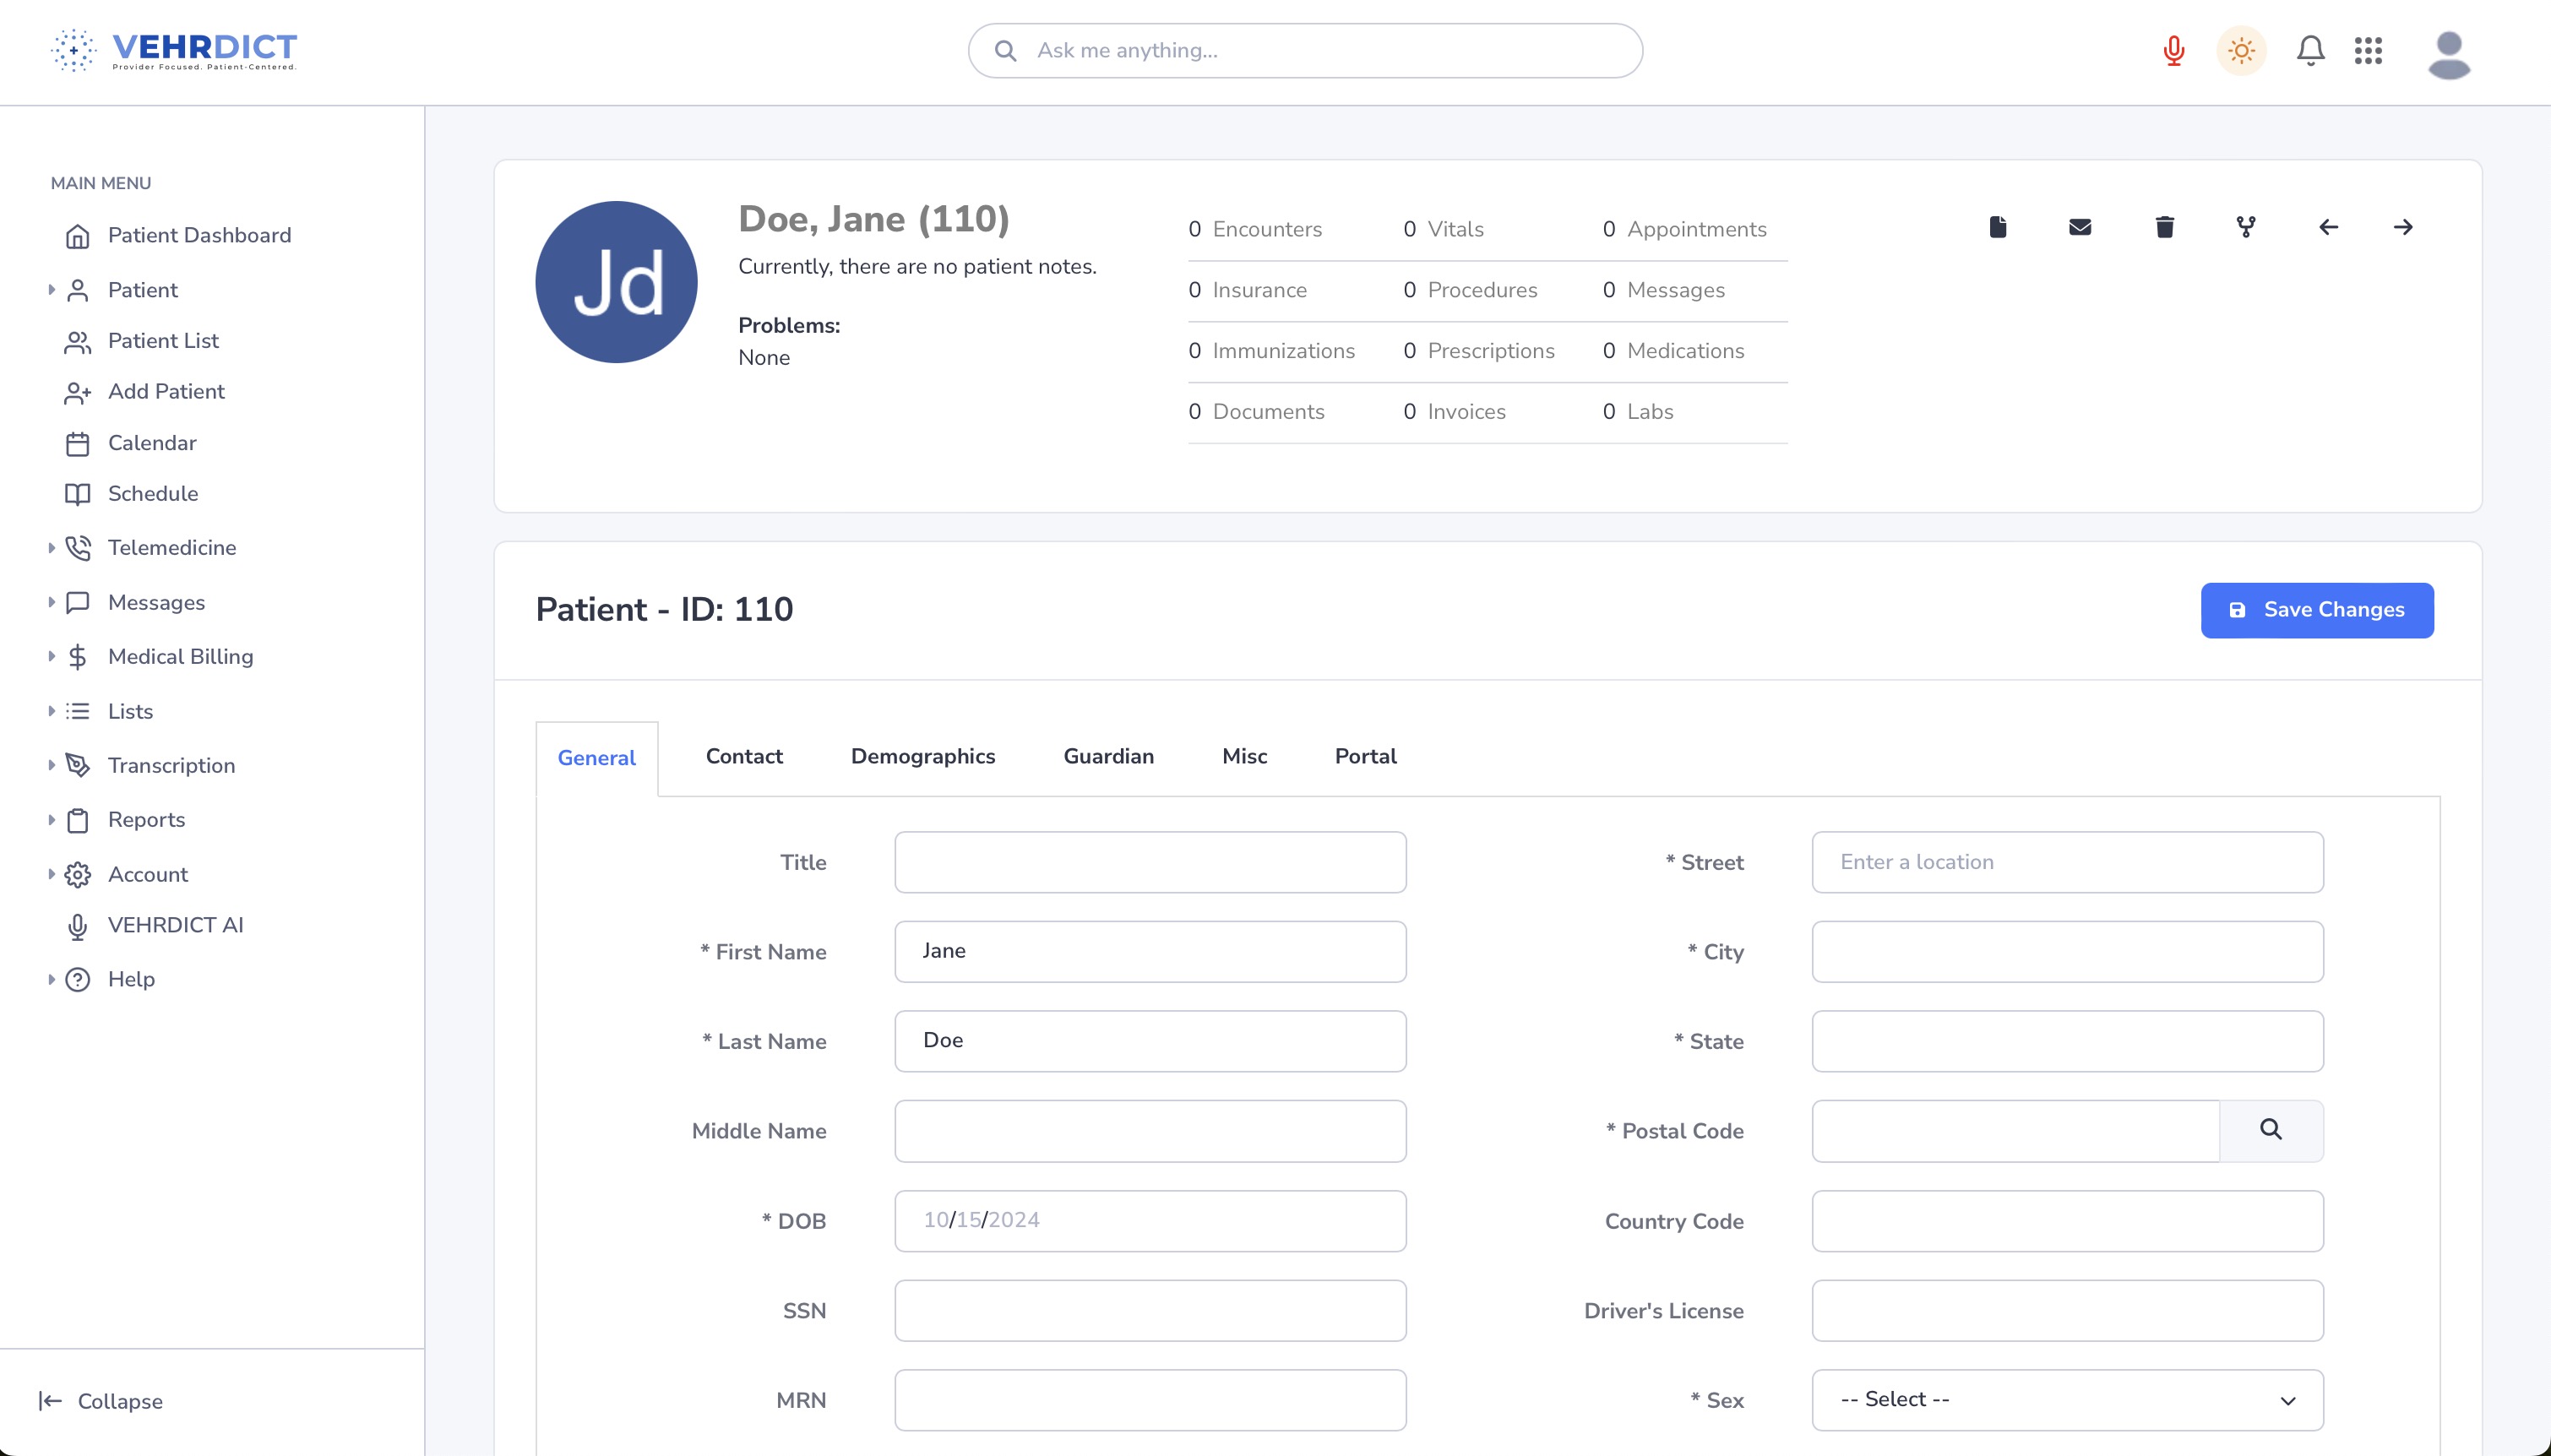
General Tab
The General tab captures:
- Full name
- Date of birth
- SSN
- Gender
- Basic identity information
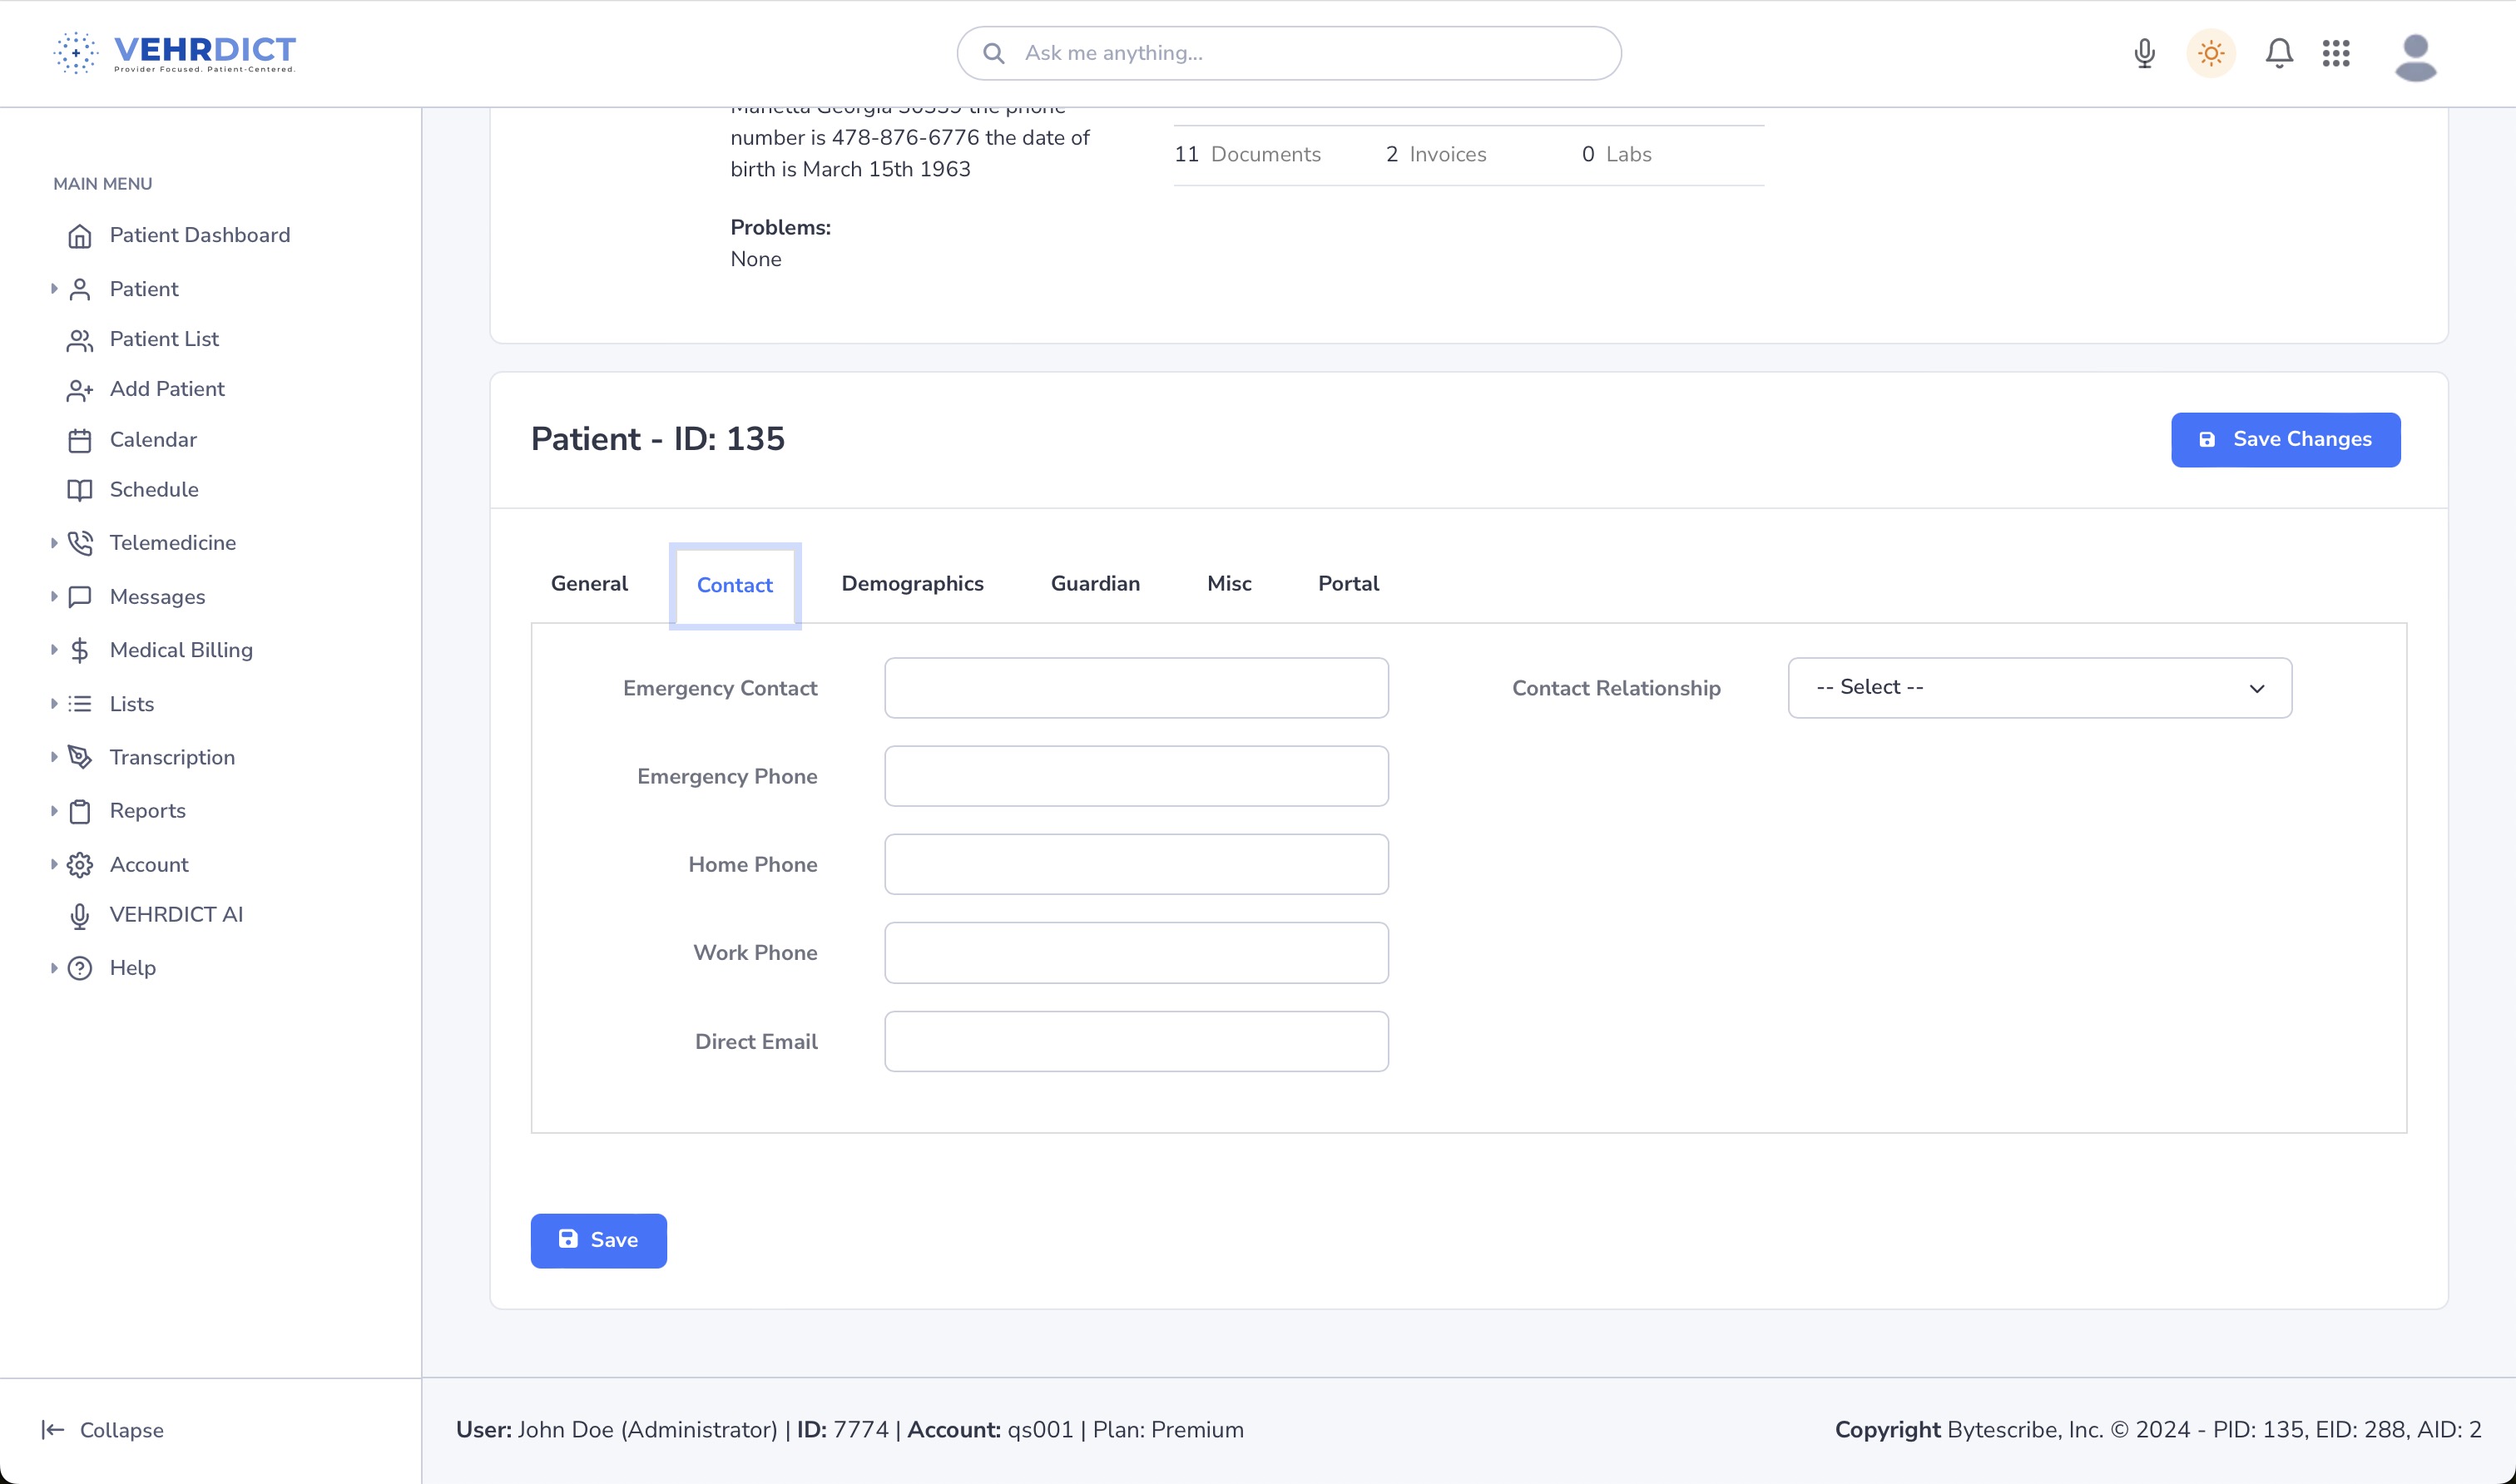
Contact Tab
The Contact tab includes:
- Emergency contact name and relationship
- Phone numbers and email
- Additional contact preferences
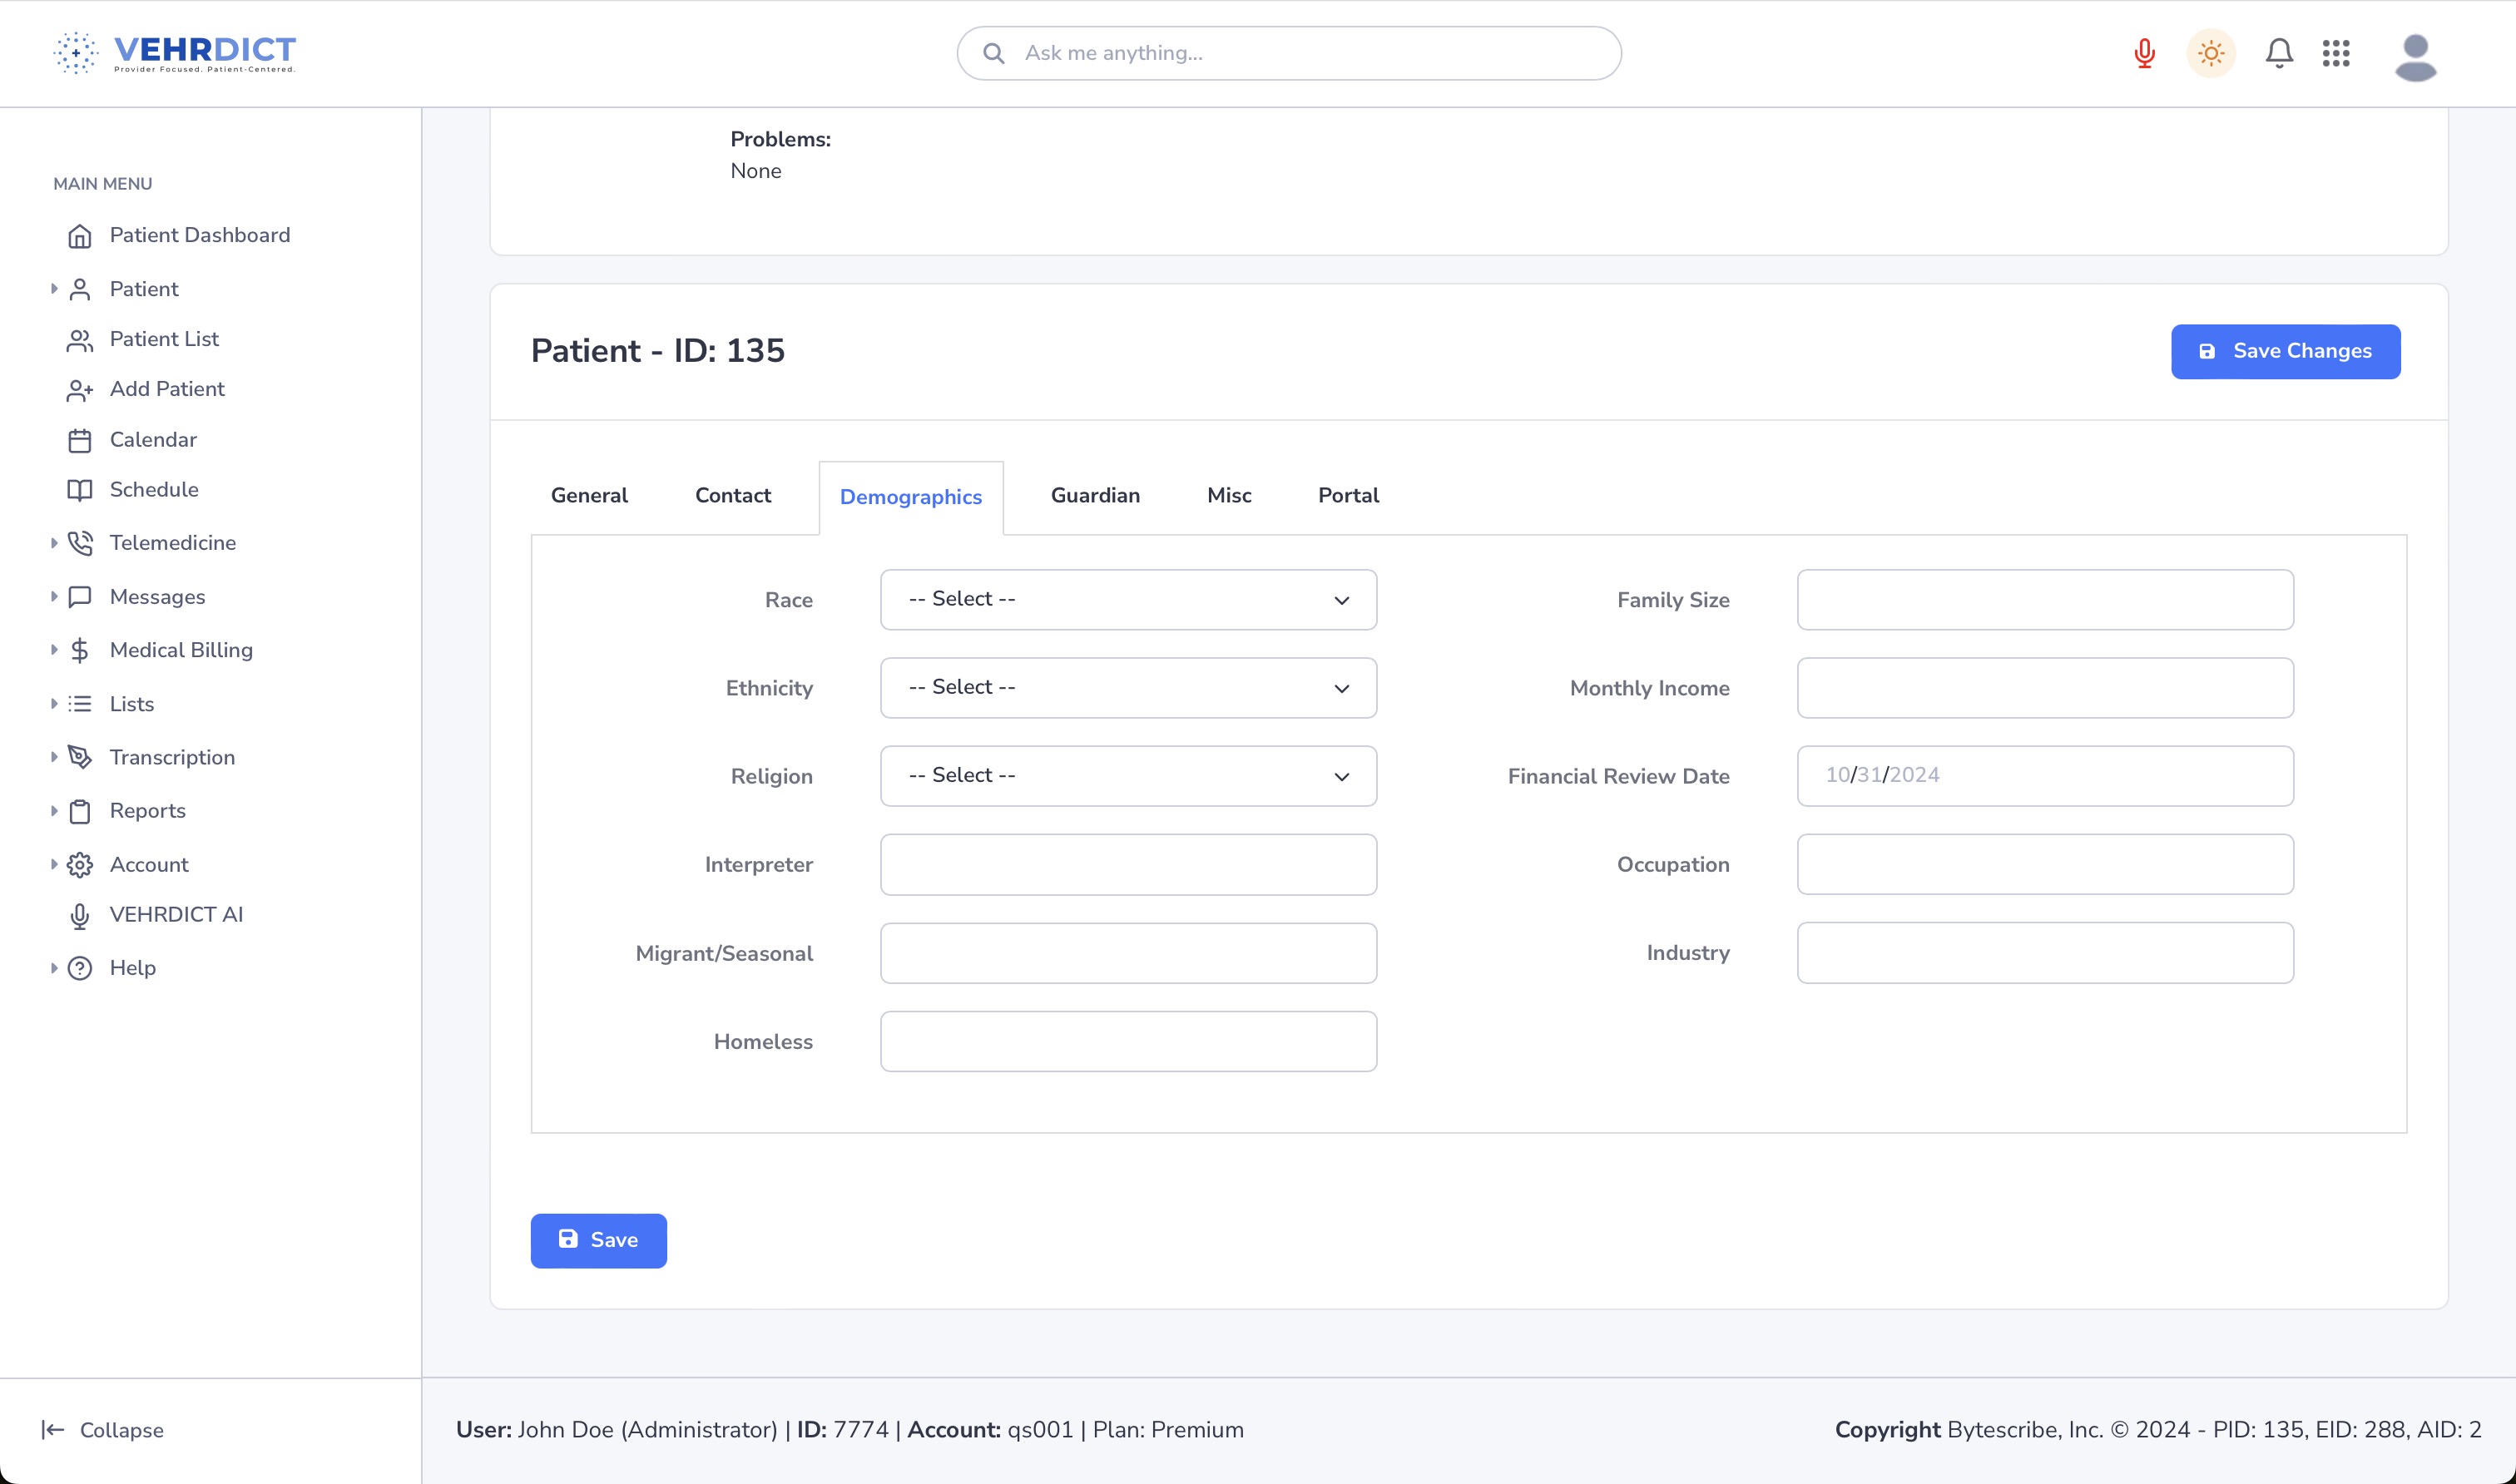
Demographics Tab
Here, you'll record:
- Race
- Ethnicity
- Religion
- Language preferences
This information helps personalize care and improve documentation compliance.
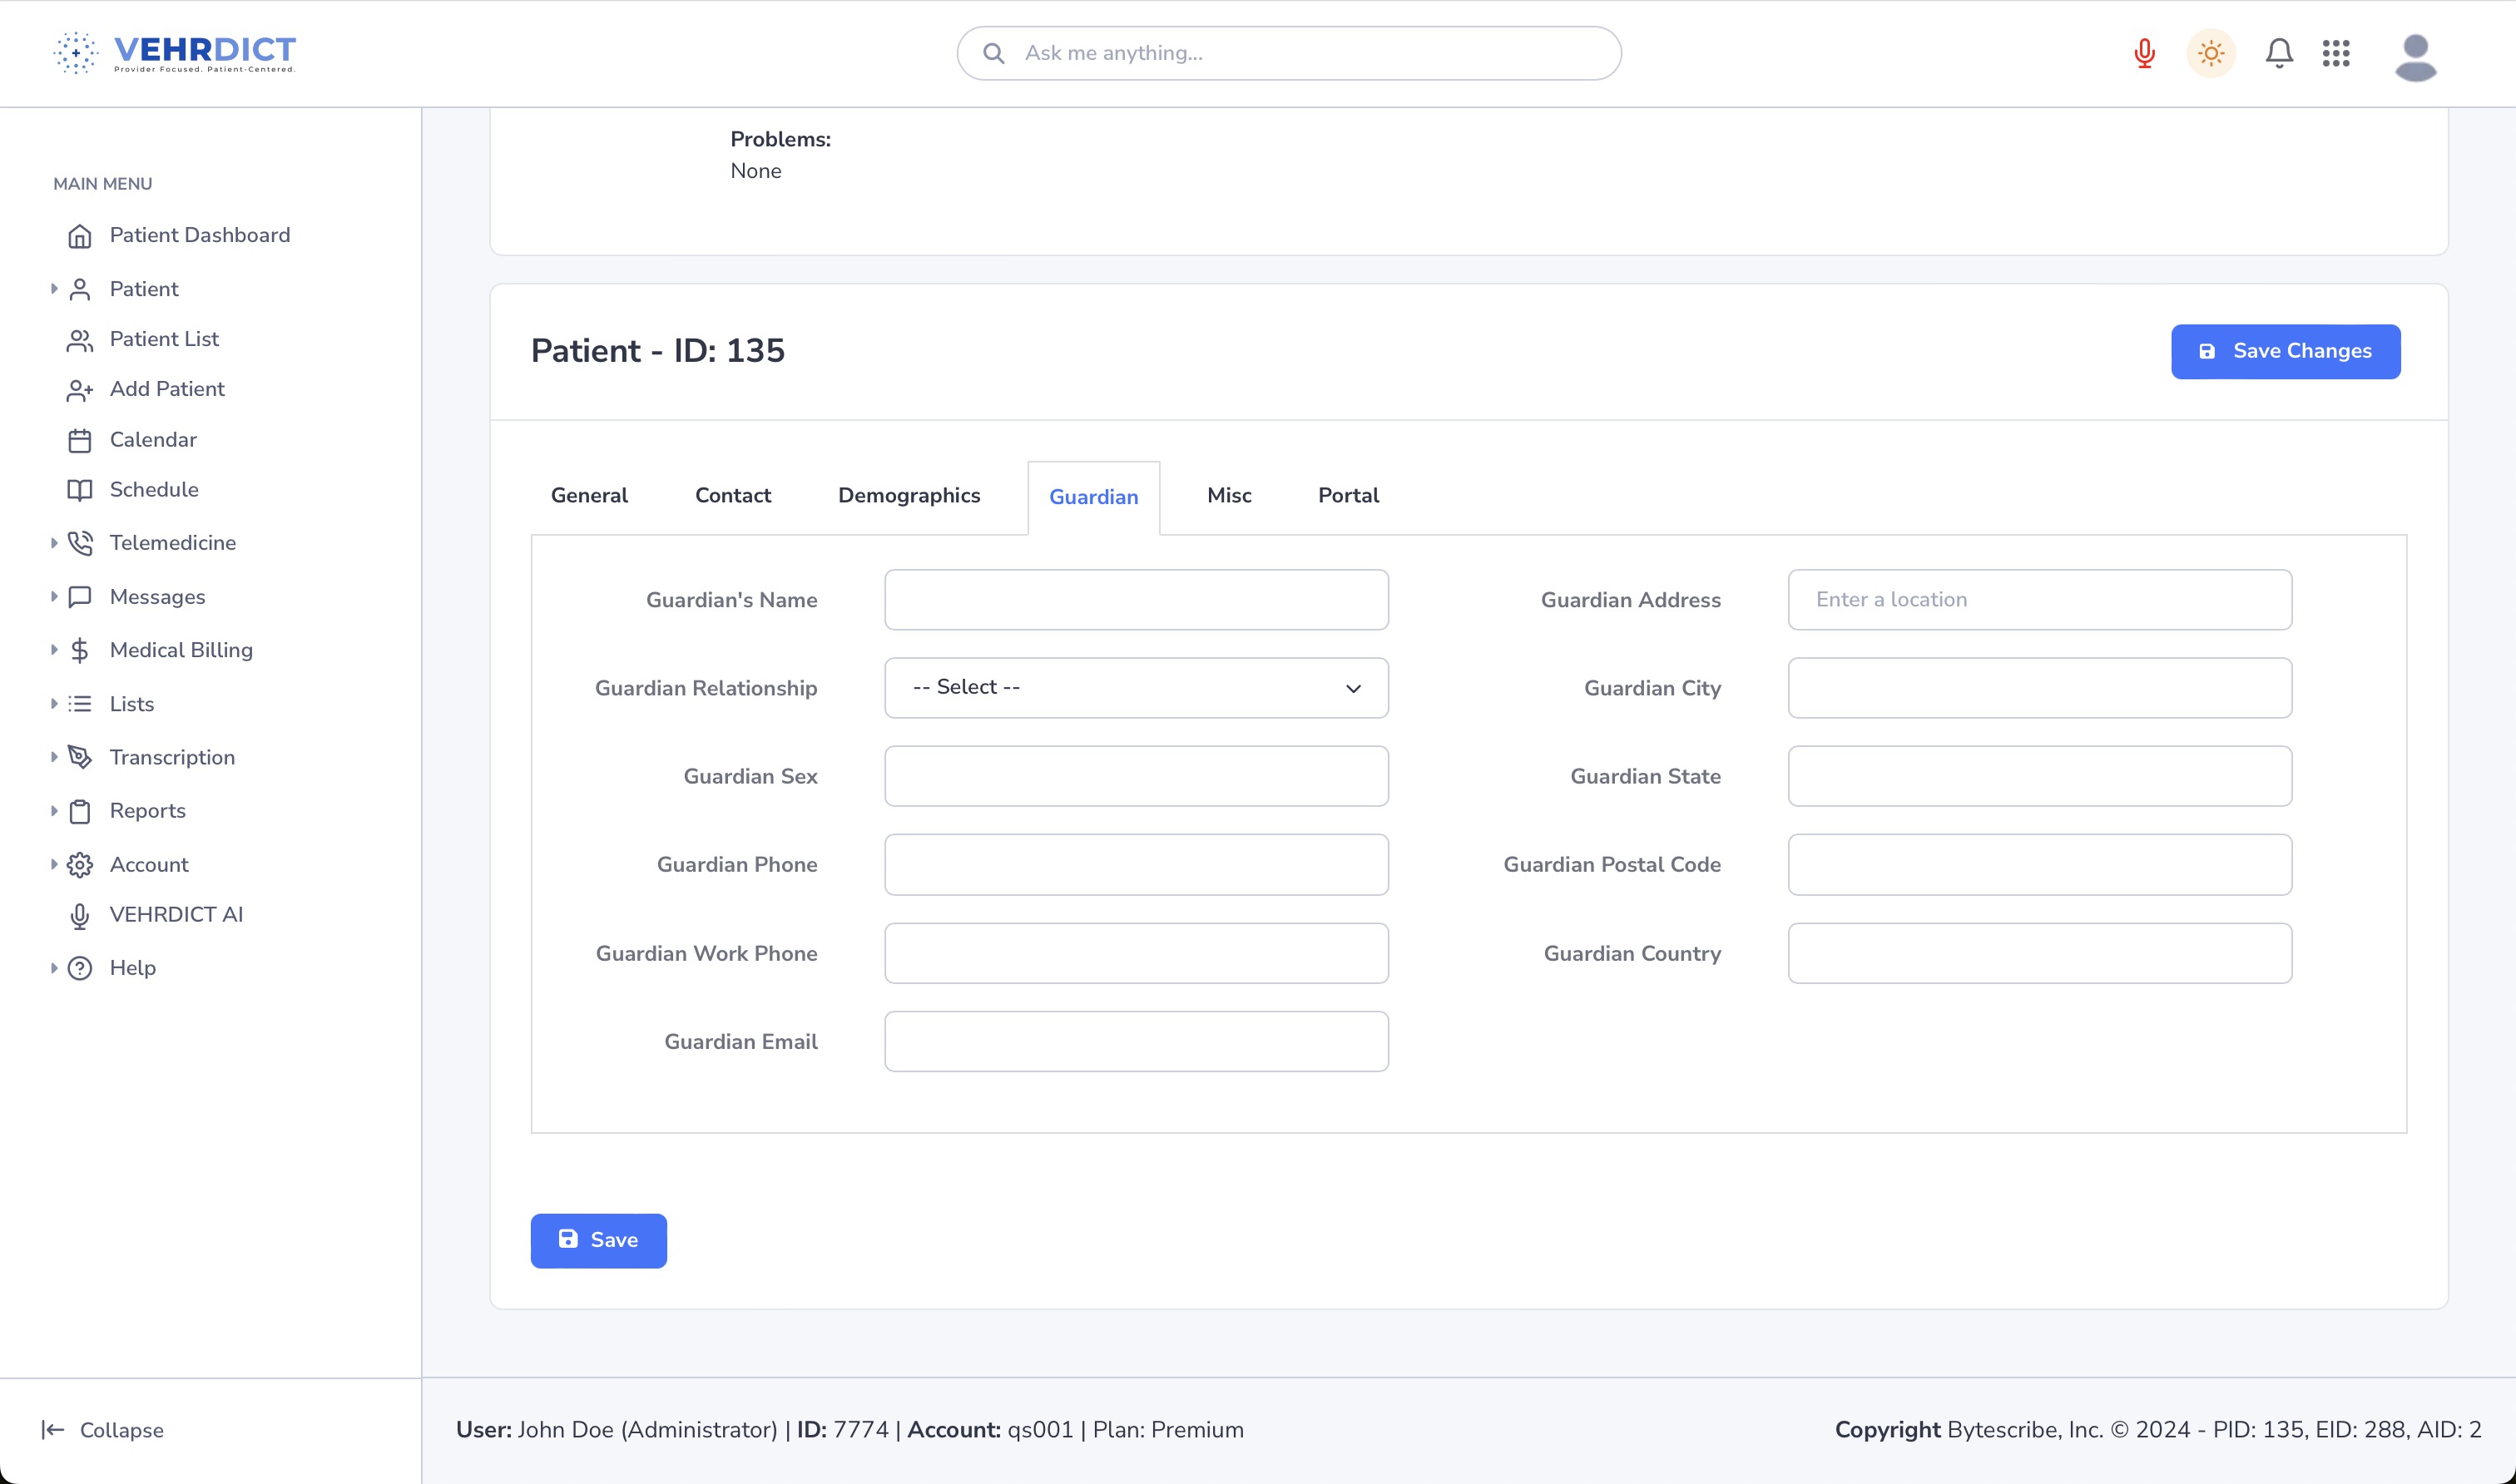
Guardian Tab
Use this section for minor patients or those with appointed guardians.
- Enter guardian name and relationship
- Select Self if the patient is their own guardian
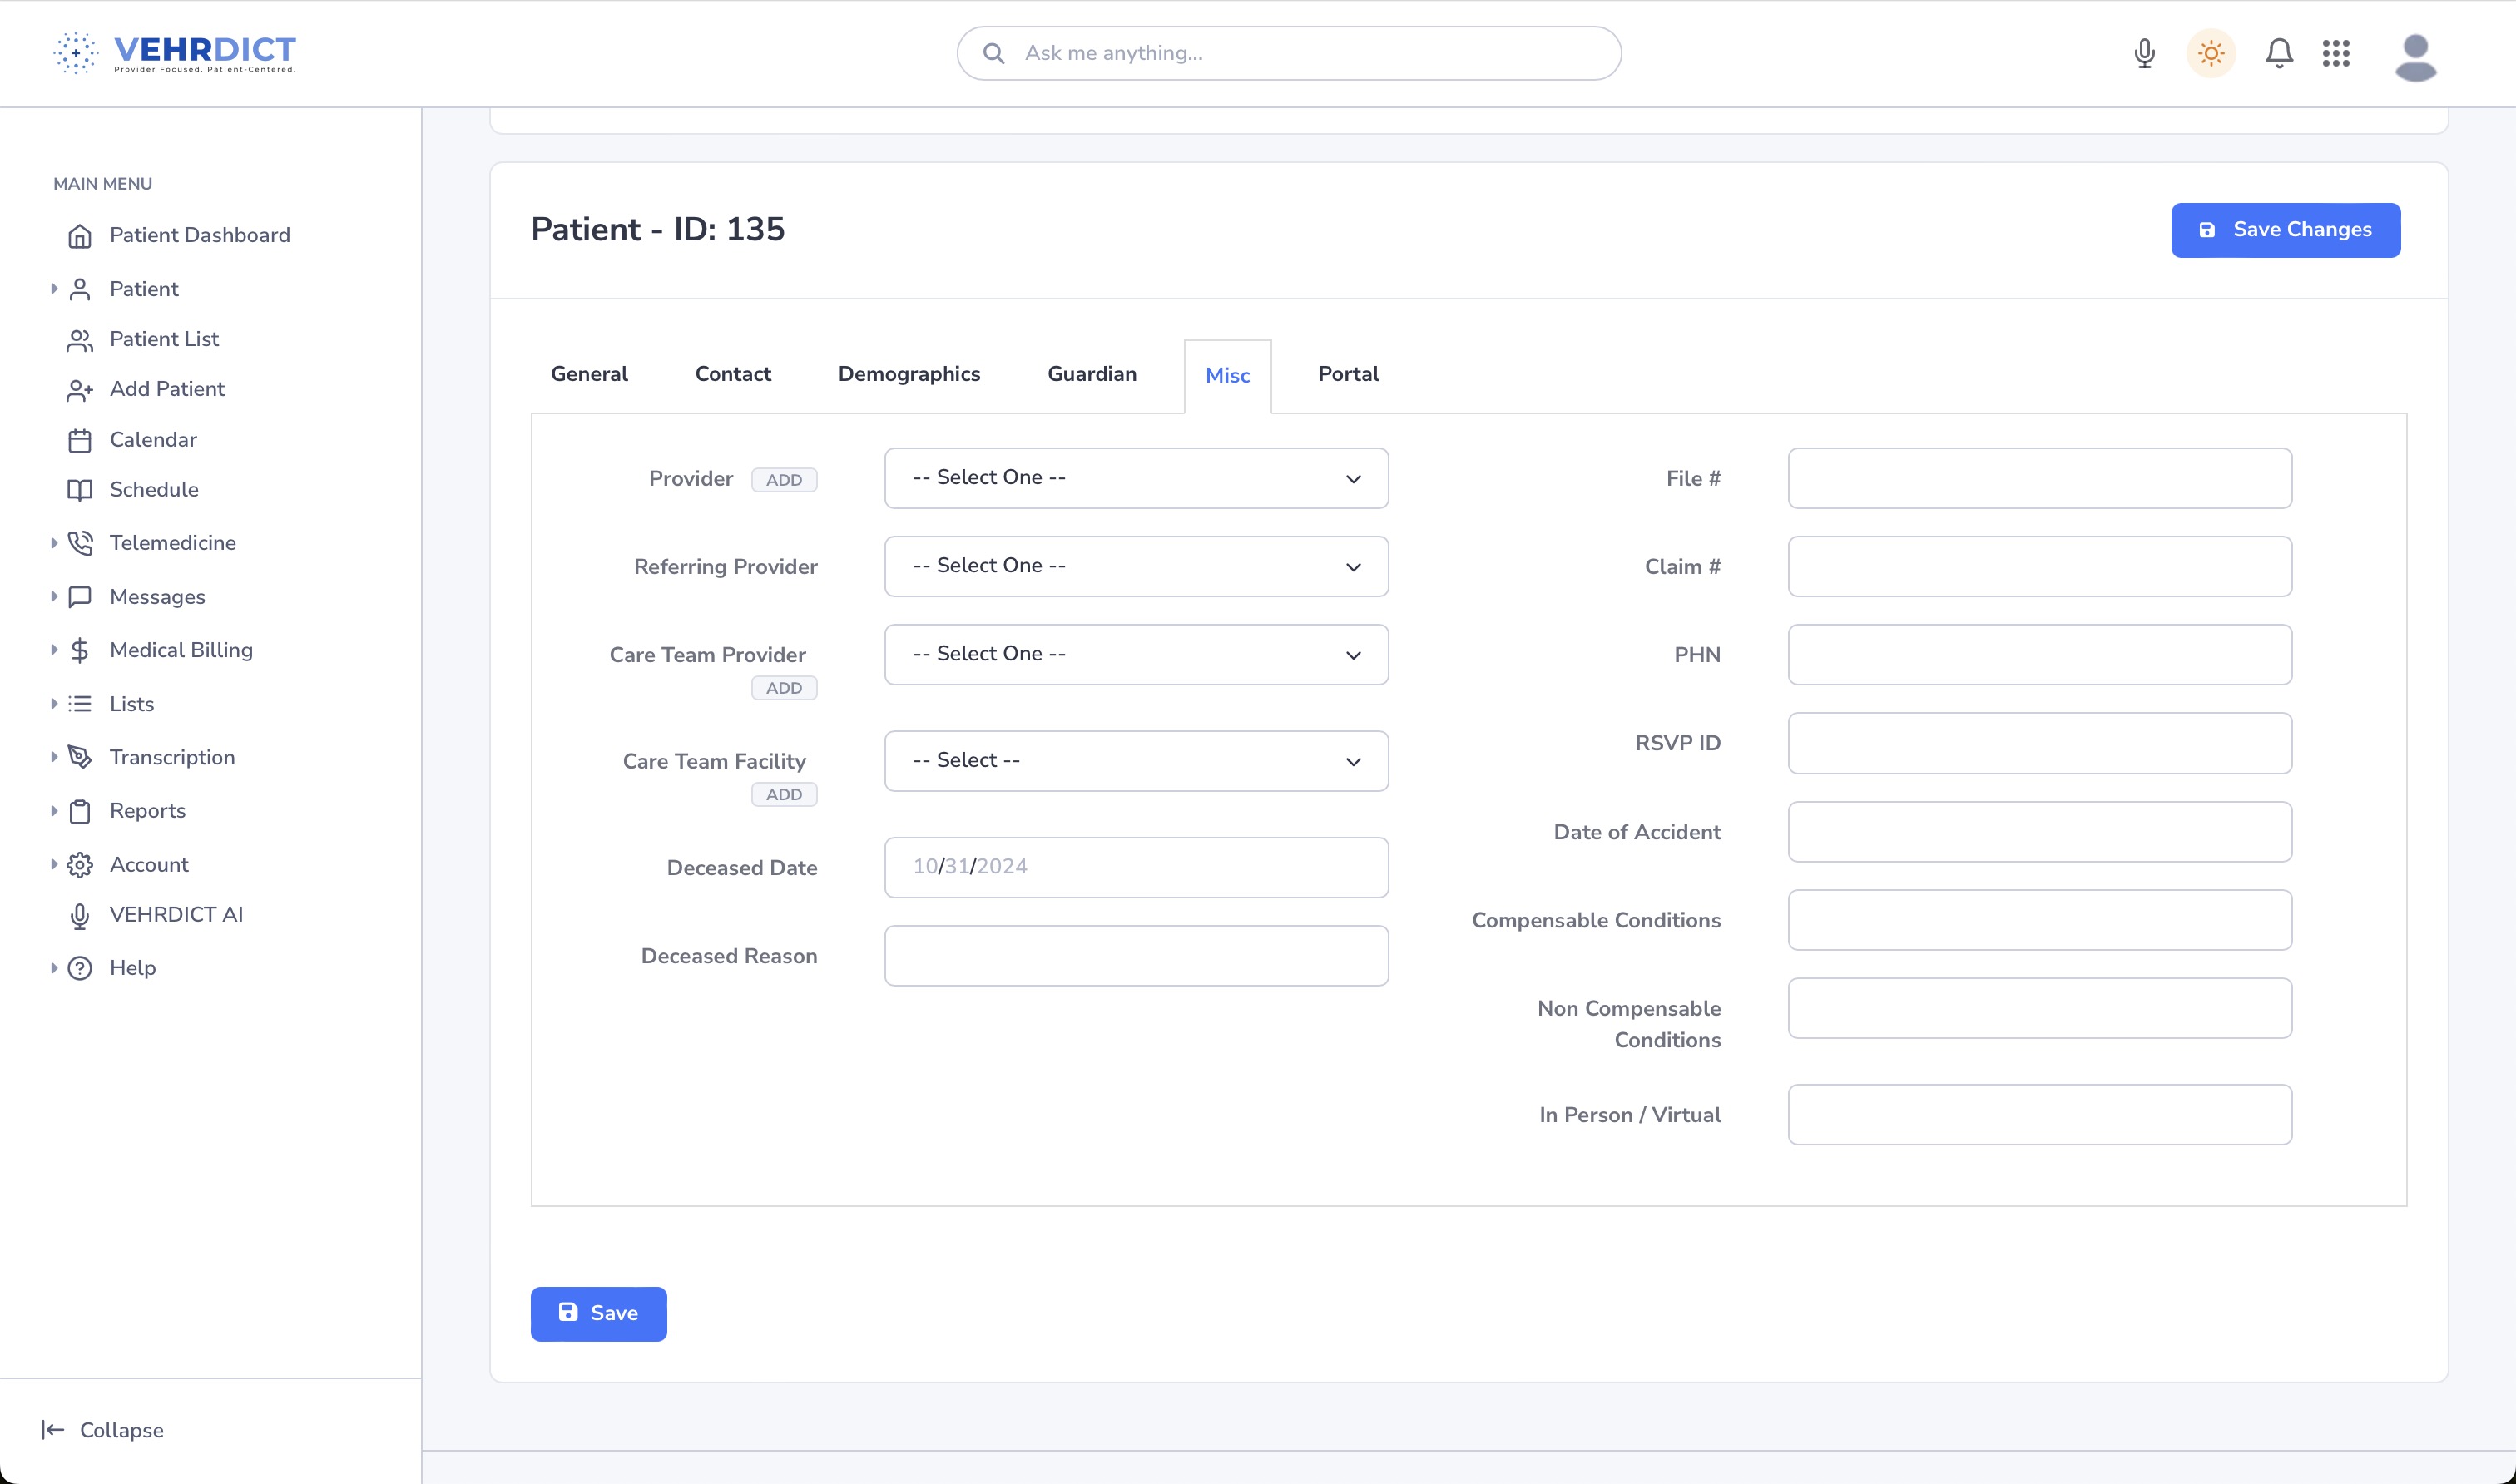
Misc Tab
This flexible tab allows you to:
- Upload a photo
- Add provider assignments
- Record sensitive status info such as:
 * Deceased status
 * Notes and tags
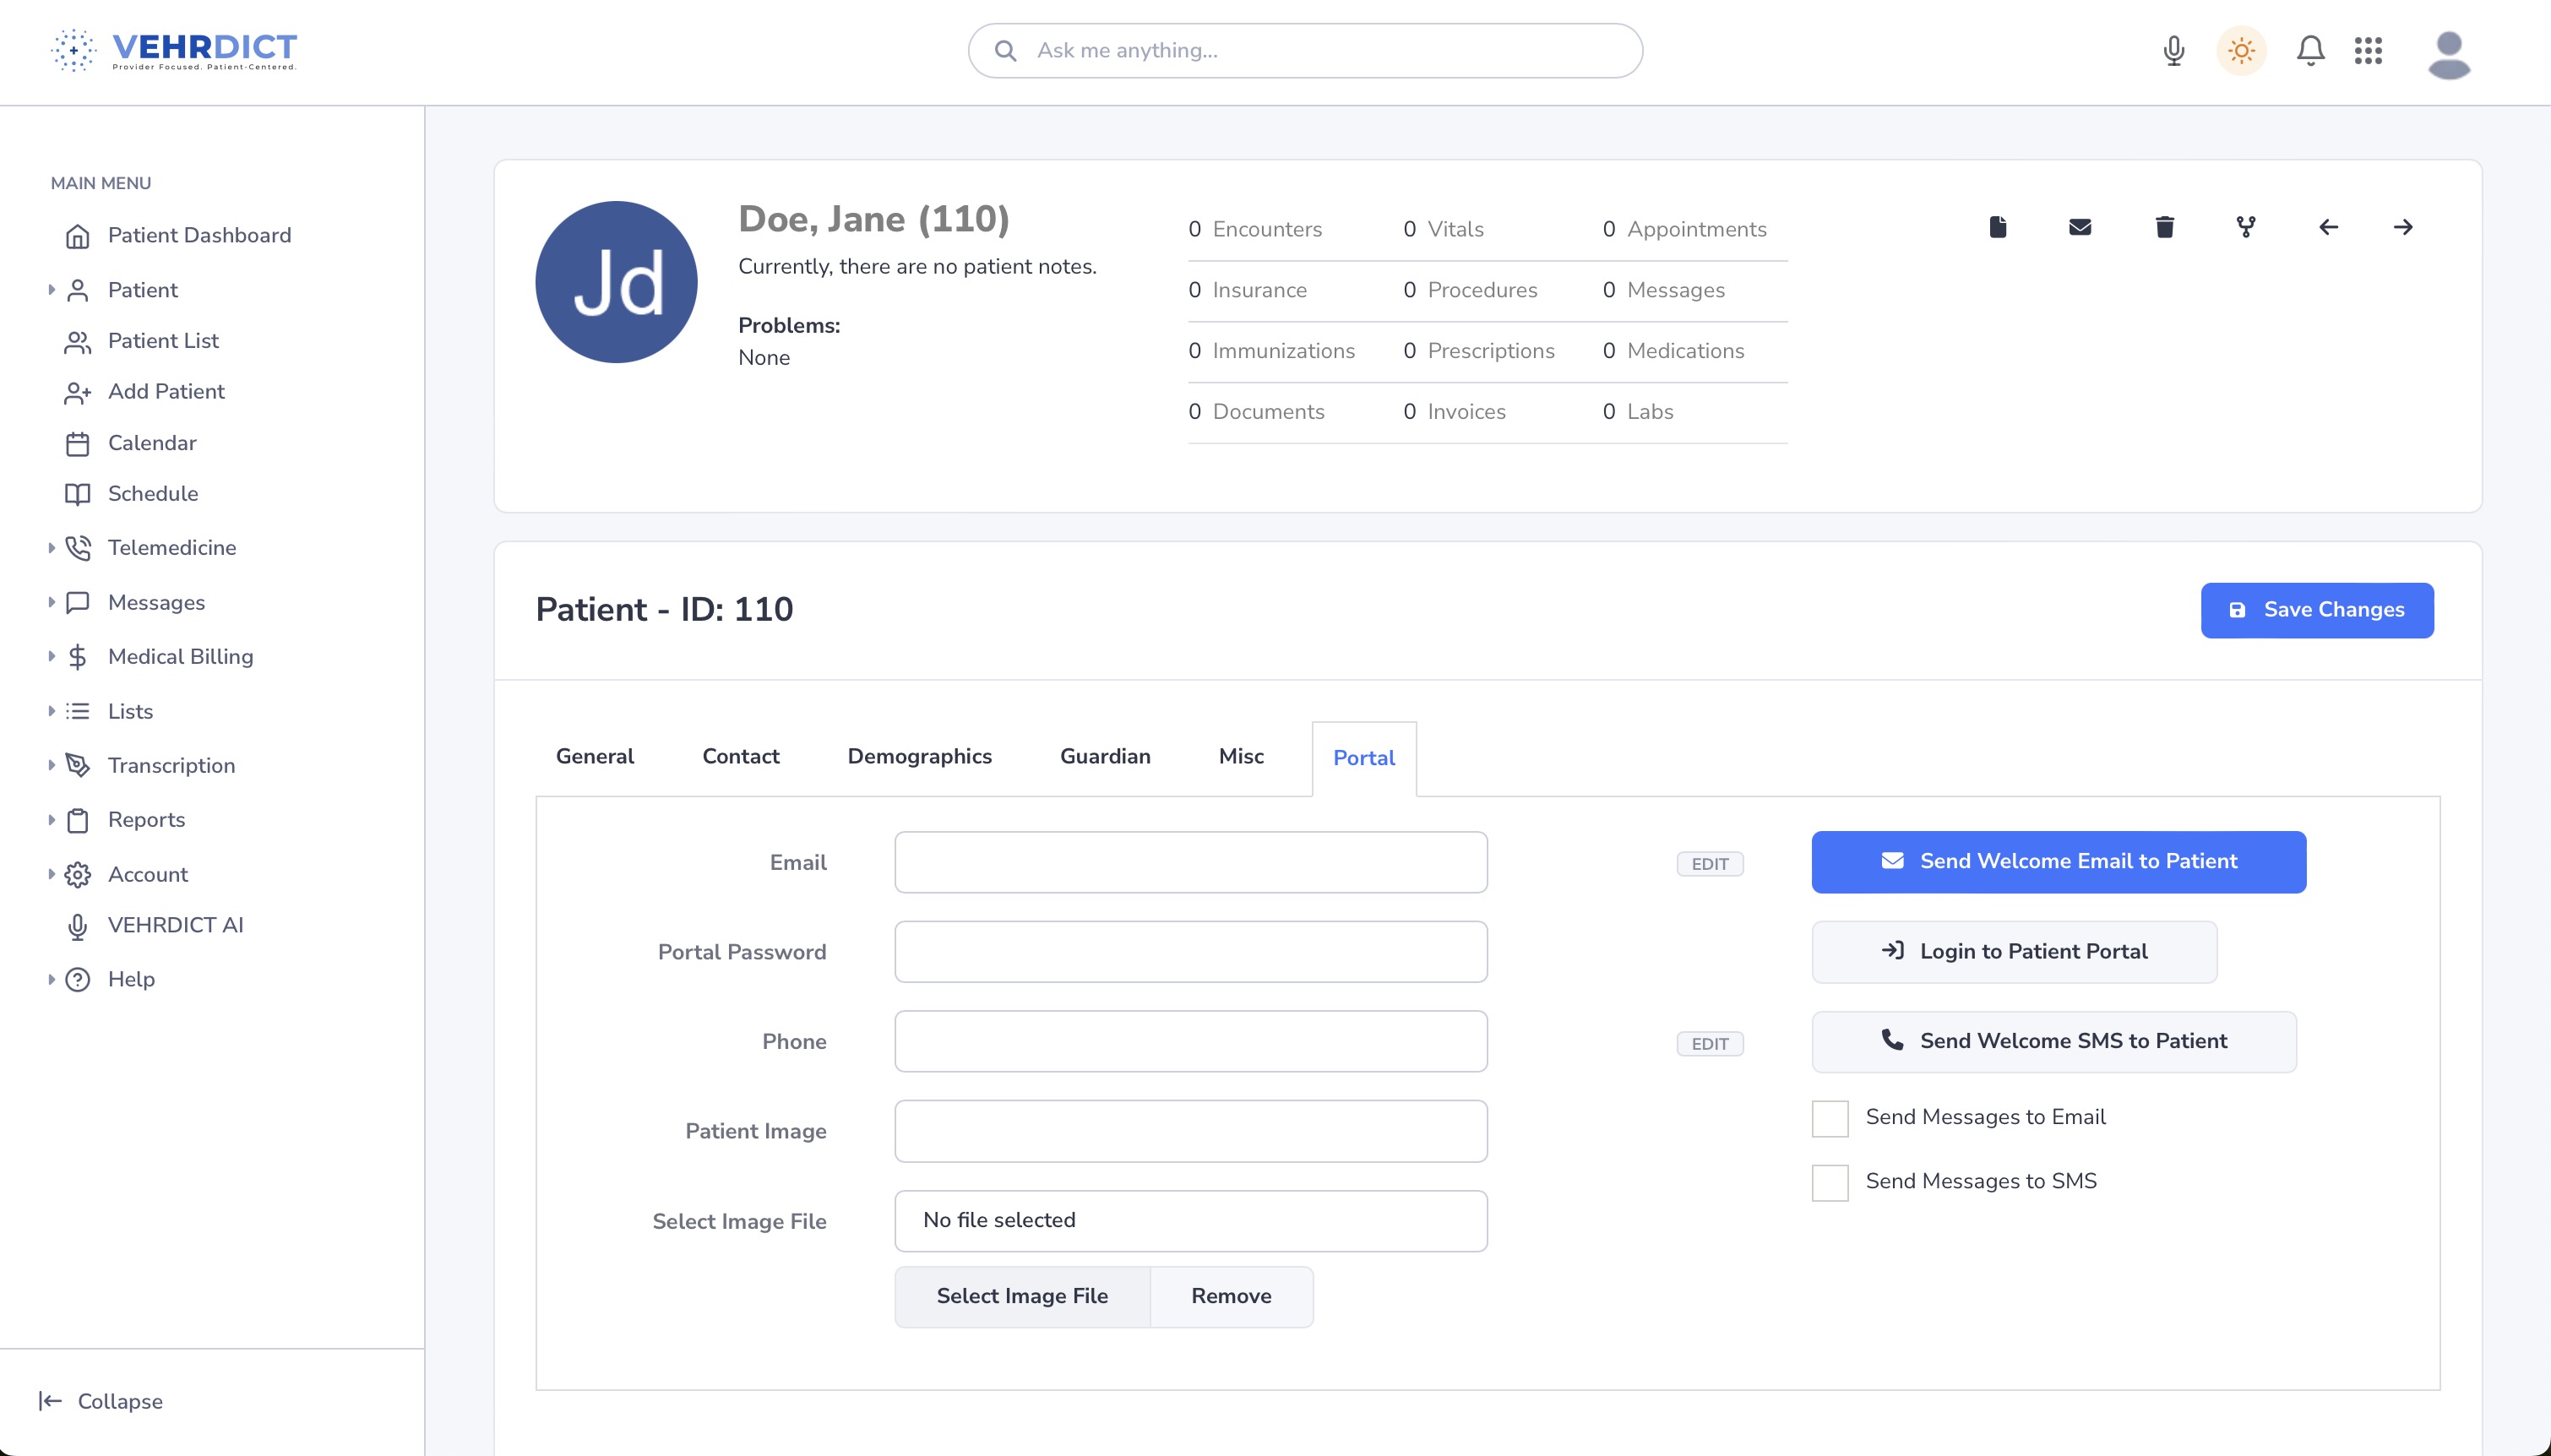
Portal Tab
Here you enable and manage patient portal access:
- Set up login credentials
- Send a welcome email
- View current portal access status
Once all required fields are filled and tabs completed, the patient record becomes active in the system and accessible for appointments, documentation, billing, and portal communication.