|
|
| (27 intermediate revisions by 2 users not shown) |
| Line 1: |
Line 1: |
| ==VEHRDICT Dashboard==
| | = VEHRDICT DOCUMENTATION = |
| '''VEHRDICT''' is a user-friendly...
| |
| == Dashboard ==
| |
|
| |
|
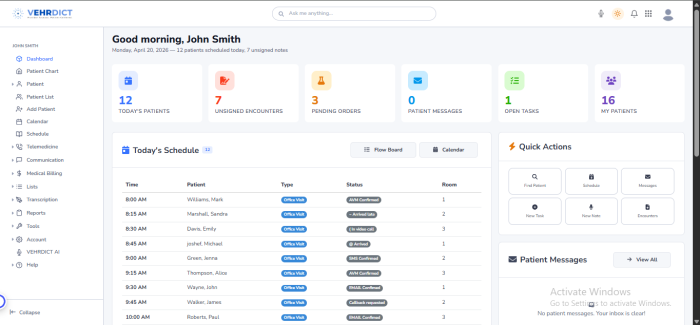
| The Dashboard in VEHRDICT is the central hub...
| | Everything you need to know about using VEHRDICT to manage clinical documentation and daily workflows. From recording patient encounters to generating accurate medical notes, VEHRDICT simplifies the process and reduces manual work. |
|
| |
|
| | This documentation covers key features like patient intake, voice transcription, clinical notes, orders, billing, and reporting. It provides clear guidance to help users work efficiently and improve accuracy. |
|
| |
|
| [[File:Photo_2026-04-07_21-35-31.jpg|800px|Dashboard Overview]]
| | Whether you are new or experienced, this guide helps you get the most out of VEHRDICT’s AI-powered tools. |
|
| |
|
|
| |
|
| === Overview === | | = What Is VEHRDICT? = |
| The dashboard provides a centralized view of key activities and patient-related information within the system. It allows users to quickly monitor appointments, pending orders, patient messages, open tasks, and recent encounters. This helps improve workflow efficiency by giving real-time insights into daily operations. Users can easily track ongoing activities, prioritize tasks, and ensure timely patient care through this interactive dashboard.
| |
|
| |
|
| The dashboard displays key metrics such as:
| | VEHRDICT is an all-in-one AI-powered clinical documentation and practice support platform designed for modern healthcare providers. It helps streamline workflows by converting voice recordings into structured medical notes while supporting patient management, clinical documentation, orders, billing, and reporting. |
| * Today's Patients
| |
| * Unsigned Encounters
| |
| * Pending Orders
| |
| * Patient Messages
| |
| * Open Tasks
| |
|
| |
|
| ## 2.5 Quick Actions
| | Instead of using multiple disconnected systems, VEHRDICT brings everything together in one unified platform—reducing manual work, saving time, and improving accuracy. From patient intake and clinical notes to orders, billing, and analytics, VEHRDICT enables healthcare teams to work more efficiently and focus more on patient care. |
| The Quick Actions section allows users to quickly access commonly used features:
| |
| - Find Patient
| |
| - Schedule
| |
| - Messages
| |
| - New Task
| |
| - New Note
| |
| - Encounters
| |
|
| |
|
| ---
| |
|
| |
|
| ## 2.6 Patient Messages
| | [[File:Screenshot 2026-04-20 212355.png|700px|Dashboard (Updated View)]] |
| Displays messages sent by patients.
| |
| If there are no messages, the system will show:
| |
| **"Your inbox is clear!"**
| |
|
| |
|
| ---
| |
|
| |
|
| ## 2.7 My Notes
| | ==Overview == |
| Displays personal notes created by the user for quick reference and documentation.
| | The VEHRDICT Dashboard provides a centralized, real-time view of patient activity, appointments, clinical tasks, and system alerts. It enables healthcare staff to monitor workflows efficiently and prioritize daily operations. |
|
| |
|
| ---
| | == Key Metrics == |
| | The top section displays important statistics: |
|
| |
|
| ## 2.8 Clinic Information
| | * Today's Patients |
| Provides details about the clinic:
| | * Unsigned Encounters |
| | * Pending Orders |
| | * Patient Messages |
| | * Open Tasks |
|
| |
|
| **Brighton Clinic**
| |
| 123 Main Street
| |
| Allentown, PA
| |
|
| |
|
| ---
| | == Today's Schedule == |
| | Displays all appointments for the current day. |
|
| |
|
| ## 2.9 Dashboard Widgets Explained
| |
| The dashboard includes several widgets that provide real-time insights:
| |
|
| |
|
| - **Today's Patients** – Displays the number of patients scheduled for today | | [[File:Screencapture-az1-bytescribe-net-vehrdict-index-php-2026-04-20-21 27 26.png|700px|Full Dashboard View]] |
| - **Unsigned Encounters** – Shows encounters that require review and signature | |
| - **Pending Orders** – Lists orders that are not yet completed | |
| - **Patient Messages** – Displays unread messages from patients | |
| - **Open Tasks** – Shows tasks that are still pending | |
|
| |
|
| ---
| |
|
| |
|
| ## 2.10 How to Use the Dashboard
| | == Recent Encounters == |
| Follow these steps to use the dashboard effectively:
| | Displays recent patient visits and medical records. |
|
| |
|
| 1. Click **Find Patient** to search for patient records
| |
| 2. Use **Schedule** to create new appointments
| |
| 3. Select **Messages** to communicate with patients
| |
| 4. Click **New Task** to assign tasks
| |
| 5. Use **New Note** to document patient information
| |
|
| |
|
| ---
| |
|
| |
|
| ## 2.11 Customization
| | [[File:Screenshot 2026-04-20 214826.png|700px|Key Metrics Section]] |
| The dashboard content may vary depending on:
| |
|
| |
|
| - User role (Doctor, Admin, Staff)
| |
| - Assigned patients
| |
| - Active tasks and appointments
| |
|
| |
|
| ---
| |
|
| |
|
| ## 2.12 Tips for Efficient Use
| | == Quick Actions == |
| - Regularly check unsigned encounters to avoid delays
| | Quick access to features: |
| - Use Quick Actions to save time
| |
| - Keep tasks updated for better workflow management
| |
| - Monitor patient messages to ensure timely responses
| |
|
| |
|
| ---
| | * Find Patient |
| | * Schedule |
| | * Messages |
| | * New Task |
| | * New Note |
| | * Encounters |
|
| |
|
| ## 2.13 Troubleshooting
| |
| If the dashboard is not displaying expected data:
| |
|
| |
|
| - Ensure you are logged in properly
| | == Tips for Efficient Use == |
| - Check if patients or appointments have been added
| | * Use Quick Actions to save time |
| - Refresh the page
| | * Monitor tasks and messages |
| - Contact the system administrator if the issue persists
| |
| | |
| ---
| |
| | |
| ## 2.14 Example Dashboard Scenario
| |
| Below is an example of a populated dashboard:
| |
| | |
| - Today's Patients: 5
| |
| - Unsigned Encounters: 2
| |
| - Pending Orders: 1
| |
| - Patient Messages: 3
| |
| - Open Tasks: 4
| |
| | |
| This example helps users understand how the dashboard reflects real-time activity.
| |
| | |
| ---
| |
| | |
| ## 2.15 Why Dashboard May Show No Data
| |
| If the dashboard displays zero values, possible reasons include:
| |
| | |
| - No appointments have been scheduled
| |
| - No tasks or notes have been created
| |
| - User permissions may restrict data creation
| |
| | |
| Ensure proper configuration and user access to fully utilize dashboard features.
| |
| | |
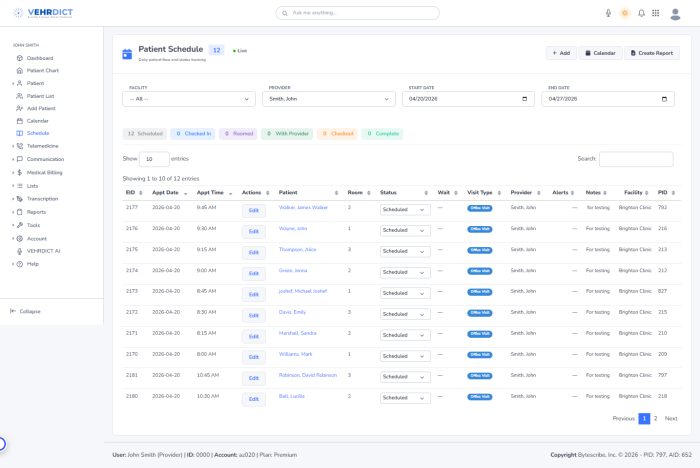
| === Today's Schedule ===
| |
| Displays all scheduled appointments for the day.
| |
| | |
| === Recent Encounters ===
| |
| Shows recent patient activity including:
| |
| * Date
| |
| * Patient
| |
| * Reason for Visit
| |
| | |
| === My Tasks ===
| |
| Displays assigned tasks.
| |
| If none:
| |
| "No tasks assigned to you. You're all caught up!"
| |
| | |
| === Quick Actions ===
| |
| * Find Patient
| |
| * Schedule
| |
| * Messages
| |
| * New Task
| |
| * New Note
| |
| * Encounters
| |
| | |
| === Patient Messages ===
| |
| Displays patient messages.
| |
| If none:
| |
| "Your inbox is clear!"
| |
| | |
| === My Notes ===
| |
| Displays user notes.
| |
| | |
| === Clinic Information ===
| |
| Brighton Clinic
| |
| 123 Main Street
| |
| Allentown, PA
| |
| | |
| === Dashboard Widgets Explained ===
| |
| The dashboard is composed of multiple widgets that provide real-time insights:
| |
| | |
| * '''Today's Patients''' – Displays the number of patients scheduled for today.
| |
| * '''Unsigned Encounters''' – Shows encounters that require review and signature.
| |
| * '''Pending Orders''' – Lists any orders that are yet to be completed.
| |
| * '''Patient Messages''' – Displays unread messages from patients.
| |
| * '''Open Tasks''' – Indicates tasks that are still pending.
| |
| | |
| === How to Use the Dashboard ===
| |
| Users can interact with the dashboard to quickly access key features:
| |
| | |
| # Click on "Find Patient" to search for patient records.
| |
| # Use "Schedule" to create new appointments.
| |
| # Select "Messages" to communicate with patients.
| |
| # Click "New Task" to assign tasks.
| |
| # Use "New Note" to document patient information.
| |
| | |
| === Customization ===
| |
| The dashboard content may vary depending on:
| |
| | |
| * User role (Doctor, Admin, Staff)
| |
| * Assigned patients
| |
| * Active tasks and appointments
| |
| | |
| === Tips for Efficient Use ===
| |
| * Regularly check unsigned encounters to avoid delays.
| |
| * Use Quick Actions to save time. | |
| * Keep tasks updated for better workflow management.
| |
| * Monitor patient messages to ensure timely responses. | |
| | |
| === Troubleshooting ===
| |
| If the dashboard is not displaying expected data:
| |
| | |
| * Ensure you are logged in properly.
| |
| * Check if patients or appointments have been added.
| |
| * Refresh the page.
| |
| * Contact system administrator if the issue persists.
| |
| | |
| === Example Dashboard Scenario ===
| |
| Below is an example of how a populated dashboard may appear:
| |
| | |
| * Today's Patients: 5
| |
| * Unsigned Encounters: 2
| |
| * Pending Orders: 1
| |
| * Patient Messages: 3
| |
| * Open Tasks: 4
| |
| | |
| This example helps users understand how the dashboard reflects real-time activity once the system is actively used.
| |
| [[File:Screenshot 2026-04-08 014618.png|1000px|center|Dashboard with patient notes]]
| |
| | |
| === Why Dashboard May Show No Data ===
| |
| If the dashboard displays zero values:
| |
| | |
| * No appointments have been scheduled
| |
| * No tasks or notes have been created
| |
| * User permissions may restrict data creation
| |
| | |
| Ensure proper configuration and user access to fully utilize dashboard features.
| |
| | |
| ## 🧑⚕️ Add Patient – Contact Information
| |
| | |
| The **Contact** section is used to enter essential patient identity and contact details. Fields marked with (*) are required.
| |
| | |
| ---
| |
| | |
| ### 📌 Personal Information
| |
| | |
| - **Title**
| |
| Enter the patient’s title (e.g., Mr., Mrs., Dr.)
| |
| | |
| - **First Name***
| |
| Enter the patient’s first name
| |
| | |
| - **Last Name***
| |
| Enter the patient’s last name
| |
| | |
| - **Middle Name**
| |
| (Optional) Enter middle name
| |
| | |
| - **Nickname**
| |
| (Optional) Enter preferred name or nickname
| |
| | |
| - **Date of Birth (DOB)***
| |
| Select date in `MM/DD/YYYY` format
| |
| | |
| - **Birth Sex***
| |
| Select from dropdown (Male, Female, Other)
| |
| | |
| ---
| |
| | |
| ### 📞 Contact Details
| |
| | |
| - **Email***
| |
| Enter a valid email address
| |
| | |
| - **Primary Phone***
| |
| Enter patient’s main contact number
| |
| | |
| ---
| |
| | |
| ### 📍 Address Information
| |
| | |
| - **Street***
| |
| Enter full street address
| |
| | |
| - **City***
| |
| Enter city name
| |
| | |
| - **State***
| |
| Enter state
| |
| | |
| - **Postal Code***
| |
| Enter ZIP/postal code
| |
| | |
| - **Country Code**
| |
| Enter country dialing code (e.g., +1 for USA)
| |
| | |
| - **County**
| |
| (Optional) Enter county name
| |
| | |
| ---
| |
| | |
| ### 🪪 Identification
| |
| | |
| - **Driver's License**
| |
| Enter driver’s license number
| |
| | |
| ---
| |
| | |
| ### 💊 Pharmacy
| |
| | |
| - **Pharmacy**
| |
| Select a pharmacy from dropdown
| |
| - Click **ADD** to create a new pharmacy
| |
| - Click **EDIT** to modify existing pharmacy
| |
| | |
| ---
| |
| | |
| ### ⚠️ Additional Information
| |
| | |
| - **Deceased Date**
| |
| Enter only if the patient is deceased
| |
| | |
| ---
| |
| | |
| ### 📝 Notes
| |
| - Ensure all required fields (*) are completed before saving
| |
| - Double-check contact details for accuracy
| |
| - Use valid formats for email and phone number
| |
| | |
| ---
| |
| | |
| ### 🖼️ Example Layout
| |
| | |
| 
| |
| | |
| [[File:Screenshot 2026-04-09 234445.png|1000px|center|VEHRDICT Dashboard Overview]]
| |
| | |
| ## How to Schedule a Patient
| |
| | |
| The scheduling feature allows healthcare providers to efficiently manage patient appointments and ensure proper time allocation for consultations, follow-ups, and procedures.
| |
| | |
| ### Steps to Schedule a Patient
| |
| | |
| 1. **Navigate to the Schedule Page**
| |
| - From the left sidebar, click on **Schedule** or **Calendar**.
| |
| | |
| 2. **Create a New Appointment**
| |
| - Click on the **Add Appointment** or **+ New** button.
| |
| | |
| 3. **Enter Patient Details**
| |
| - Select an existing patient from the list
| |
| - Or add a new patient if not already registered
| |
| | |
| 4. **Set Appointment Information**
| |
| - **Date:** Choose the appointment date
| |
| - **Time:** Select the appropriate time slot
| |
| - **Type:** (e.g., Office Visit, Follow-up, Telemedicine)
| |
| - **Status:** Set as *Scheduled*
| |
| - **Room:** Assign a room if applicable
| |
| | |
| 5. **Add Notes (Optional)**
| |
| - Include any relevant patient notes or instructions for the visit
| |
| | |
| 6. **Save the Appointment**
| |
| - Click **Save** to confirm the booking
| |
| | |
| ---
| |
| | |
| ### Viewing Scheduled Patients
| |
| | |
| - Scheduled patients will appear in:
| |
| - **Today's Schedule**
| |
| - **Upcoming Appointments (Next 7 Days)**
| |
| - **Calendar View**
| |
| | |
| ---
| |
| | |
| ### Tips for Effective Scheduling
| |
| | |
| - Avoid overlapping appointments
| |
| - Add clear notes for better patient management
| |
| - Regularly update appointment status (Completed, Pending, Cancelled)
| |
| - Ensure all required fields are filled before saving
| |
| | |
| ---
| |
| | |
| ### Example Appointment Entry
| |
| | |
| | Time | Patient Name | Type | Status | Room |
| |
| |------------|-----------------|----------------|------------|------|
| |
| | 10:30 AM | Alice Thompson | Office Visit | Scheduled | 102 |
| |
| | |
| [[File:Screenshot 2026-04-08 233913.png|800px|center|Dashboard Overview]]
| |
| | |
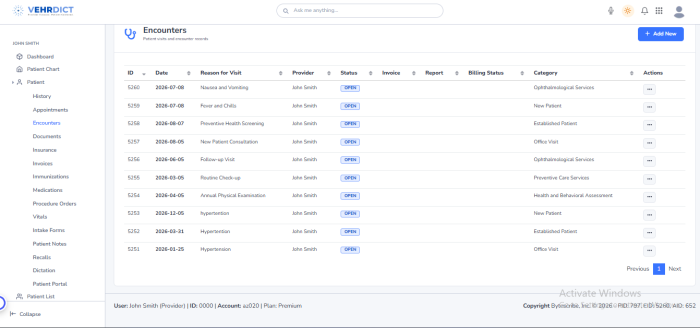
| ## 📅 Encounters
| |
| - 1 Encounter recorded
| |
| | |
| ---
| |
| | |
| ## ➕ Add New
| |
| Use **"Add New"** to create a new encounter or record.
| |
| | |
| Put here patients informations:
| |
| [[File:Screenshot 2026-04-09 001648.png|800px|center|Dashboard Section View]]
| |
| | |
| | |
| | |
| How to add insurance?
| |
| Go to insurance area
| |
| | |
| 1. General info
| |
| | |
| 2. Subscriber
| |
| | |
| 3. Employer
| |
| | |
| 1.1 General info:
| |
| | |
| [[File:Screenshot 2026-04-09 003437.png|800px|center|Dashboard Section View]]
| |
| | |
| 1.2 Subscriber
| |
| | |
| [[File:Screenshot 2026-04-09 005527.png|800px|center|Insurance - Subscriber Section]]
| |
| | |
| 1.3 Employer
| |
| | |
| [[File:Screenshot 2026-04-09 010605.png|800px|center|Insurance - Employer Section]]
| |
| | |
| | |
| | |
| How to add Documents?
| |
| Go to the documents are and record patients dictations and upload file.
| |
| [[File:Screenshot 2026-04-09 012558.png|800px|center|Documents Section View]]
| |
| | |
| | |
| | |
| Pending Orders:
| |
| Go to the order menu and put patients informations:
| |
| [[File:Screenshot 2026-04-09 020802.png|800px|center|Pending Orders Section View]]
| |
| | |
| | |
| How to make tickets?
| |
| | |
| 1. Go to the "My Task"
| |
| | |
| 2. Add new task.
| |
| | |
| 3. Put patients informations.
| |
| | |
| [[File:Screenshot 2026-04-09 021919.png|800px|center|Ticket Creation Section View]]
| |
| | |
| | |
| How to add Madications?
| |
| | |
| 1. Open Patinets list
| |
| | |
| 2. Open "New prescription"
| |
| | |
| 3. Put some informations
| |
| | |
| Example:
| |
| | |
| [[File:Screenshot 2026-04-09 193705.png|800px|center|New Prescription Section]]
| |
| | |
| | |
| 🩺 How to Open Vitals Section
| |
| | |
| ✅ Method 1 (From Patient Profile)
| |
| | |
| Go to Patients List
| |
| | |
| Select any patient
| |
| | |
| Open the patient’s Profile / Chart
| |
| | |
| Look for Vitals or Clinical / Medical Records tab
| |
| | |
| Click on Vitals
| |
| | |
| Click Add New or + Add Vitals
| |
| | |
| ✅ Method 2 (From Encounter)
| |
| | |
| Go to Encounters
| |
| | |
| Open an existing encounter OR create a new one
| |
| | |
| Inside the encounter page, find Vitals section
| |
| | |
| Click Add Vitals
| |
| | |
| ✅ Method 3 (Quick Action – if available)
| |
| | |
| Go to Dashboard
| |
| | |
| Use Quick Actions
| |
| | |
| Click New Note / Encounter
| |
| | |
| Add vitals inside that record
| |
| | |
| 📌 After Opening Vitals
| |
| | |
| You will see fields like:
| |
| | |
| Blood Pressure (Systolic/Diastolic)
| |
| | |
| Weight & Height
| |
| | |
| Temperature
| |
| | |
| Pulse & Respiration
| |
| | |
| BMI
| |
| | |
| Oxygen Saturation
| |
| | |
| 👉 Fill the values → Click Save
| |
| | |
| [[File:Screenshot 2026-04-09 195206.png|800px|center|Vitals Section]]
| |
| | |
| | |
| 💳 How to Set Medical Billing in Payment Section
| |
| | |
| ✅ Step 1: Create/Verify Encounter
| |
| | |
| Go to Encounters
| |
| | |
| Open or create a patient encounter
| |
| | |
| Make sure services/procedures are added (CPT/charges)
| |
| | |
| 👉 Payment depends on this encounter
| |
| | |
| 🧾 Step 2: Generate Charges / Claim
| |
| | |
| Go to Billing / Claims
| |
| | |
| Create a claim for that encounter
| |
| | |
| Add:
| |
| | |
| Procedure codes (CPT)
| |
| | |
| Diagnosis codes (ICD)
| |
| | |
| Charges amount
| |
| | |
| 💰 Step 3: Open Payment Section
| |
| | |
| Go to Billing → Payments
| |
| | |
| Click Add Payment
| |
| | |
| You will see the form like your screenshot
| |
| | |
| 🧩 Step 4: Fill Payment Fields
| |
| | |
| 🔹 Basic Info
| |
| | |
| PID: Patient ID (auto or manual)
| |
| | |
| Encounter: Link the encounter (very important)
| |
| | |
| Session ID: Visit/session reference
| |
| | |
| 🔹 Payer Type
| |
| | |
| Choose one:
| |
| | |
| Insurance → if insurance is paying
| |
| | |
| Patient → if self-pay
| |
| | |
| Other → adjustments
| |
| | |
| 🔹 Payment Amounts
| |
| | |
| Pay Amount: Amount received (e.g., $100)
| |
| | |
| Allowed Amount: Insurance-approved amount (e.g., $80)
| |
| | |
| | |
| 👉 Difference = adjustment/write-off
| |
| | |
| 🔹 Codes (Important for billing)
| |
| | |
| Account Code: Internal billing account (e.g., revenue code)
| |
| | |
| Reason Code: Adjustment reason (common examples):
| |
| | |
| PR-1 → Patient responsibility
| |
| | |
| CO-45 → Contractual obligation
| |
| | |
| CO-16 → Missing info
| |
| | |
| 🔹 Memo
| |
| | |
| Add note like:
| |
| | |
| “Insurance partial payment”
| |
| | |
| “Copay received”
| |
| | |
| 🔹 Post Time
| |
| | |
| Date & time when payment is recorded
| |
| | |
| ✅ Step 5: Save Payment
| |
| | |
| Click Save → Payment will be applied to the encounter/claim
| |
| | |
| 🔄 Example Workflow (Simple)
| |
| | |
| Add Patient
| |
| | |
| Create Encounter
| |
| | |
| Add CPT/ICD codes
| |
| | |
| Generate Claim
| |
| | |
| Add Payment (your form)
| |
| | |
| [[File:Screenshot 2026-04-09 214253.png|800px|center|Payment Details Section]]
| |
| | |
| 📊 How to Create a Billing Report
| |
| | |
| ✅ Step 1: Open Billing Reports
| |
| | |
| Go to Billing menu
| |
| | |
| Click on Reports or Billing Reports
| |
| | |
| You’ll see the form like your screenshot
| |
| | |
| 🧾 Step 2: Select Patient (Optional)
| |
| | |
| Click ADD next to Patient
| |
| | |
| Choose a specific patient (e.g., Olivia Scott)
| |
| | |
| 👉 Leave blank if you want a report for all patients
| |
| | |
| 💳 Step 3: Enter Payment Filter
| |
| | |
| Enter amount (e.g., $100, $250)
| |
| | |
| 👉 Optional — use this to filter specific payment values
| |
| | |
| 📌 Step 4: Choose Status
| |
| | |
| Select one:
| |
| | |
| Paid → completed payments
| |
| | |
| Pending → not yet paid
| |
| | |
| Partial → partially paid
| |
| | |
| Denied → rejected claims
| |
| | |
| 📅 Step 5: Set Date Range
| |
| | |
| Begin Date: Start date
| |
| | |
| End Date: End date
| |
| | |
| 👉 Example:
| |
| | |
| 03/10/2026 → 04/09/2026
| |
| | |
| 📄 Step 6: Select Display Type
| |
| | |
| List → detailed records
| |
| | |
| Summary → grouped totals
| |
| | |
| 🚀 Step 7: Generate Report
| |
| | |
| Click Create Report
| |
| | |
| System will generate:
| |
| | |
| Payment records
| |
| | |
| Patient details
| |
| | |
| Status & totals
| |
| | |
| | |
| 🔄 Example Workflow
| |
| | |
| Billing → Reports
| |
| | |
| Select patient
| |
| | |
| Set status = Paid
| |
| | |
| Choose date range
| |
| | |
| Click Create Report
| |
| | |
| [[File:Screenshot 2026-04-09 215159.png|800px|center|Billing Report Section]]
| |
VEHRDICT DOCUMENTATION
Everything you need to know about using VEHRDICT to manage clinical documentation and daily workflows. From recording patient encounters to generating accurate medical notes, VEHRDICT simplifies the process and reduces manual work.
This documentation covers key features like patient intake, voice transcription, clinical notes, orders, billing, and reporting. It provides clear guidance to help users work efficiently and improve accuracy.
Whether you are new or experienced, this guide helps you get the most out of VEHRDICT’s AI-powered tools.
What Is VEHRDICT?
VEHRDICT is an all-in-one AI-powered clinical documentation and practice support platform designed for modern healthcare providers. It helps streamline workflows by converting voice recordings into structured medical notes while supporting patient management, clinical documentation, orders, billing, and reporting.
Instead of using multiple disconnected systems, VEHRDICT brings everything together in one unified platform—reducing manual work, saving time, and improving accuracy. From patient intake and clinical notes to orders, billing, and analytics, VEHRDICT enables healthcare teams to work more efficiently and focus more on patient care.
Overview
The VEHRDICT Dashboard provides a centralized, real-time view of patient activity, appointments, clinical tasks, and system alerts. It enables healthcare staff to monitor workflows efficiently and prioritize daily operations.
Key Metrics
The top section displays important statistics:
- Today's Patients
- Unsigned Encounters
- Pending Orders
- Patient Messages
- Open Tasks
Today's Schedule
Displays all appointments for the current day.
Recent Encounters
Displays recent patient visits and medical records.
Quick Actions
Quick access to features:
- Find Patient
- Schedule
- Messages
- New Task
- New Note
- Encounters
Tips for Efficient Use
- Use Quick Actions to save time
- Monitor tasks and messages


